KeyShot HDRI vs Physical Lights

Everyone knows lighting can make or break an image. But do you know when to use a KeyShot HDRI vs physical lights? KeyShot has two methods of lighting, five physical light types and dozens of settings for each. Most people try a few and move on. But what if you knew which option to use BEFORE going into trial-and-error mode?
Want to light with confidence and speed? You'll be one step closer by the time you finish this article! By understanding a few simple rules about lights and which to use, you too can put an end to second guesses. Let's look at the pros, cons, differences and scenarios in which you'd use HDRI lighting versus physical lights in KeyShot.

TLDR; The over-simplified summary: HDRIs are faster to set up and render, whereas physical lights will offer more realism and more control at the expense of setup time and complexity.
What is an HDRI?
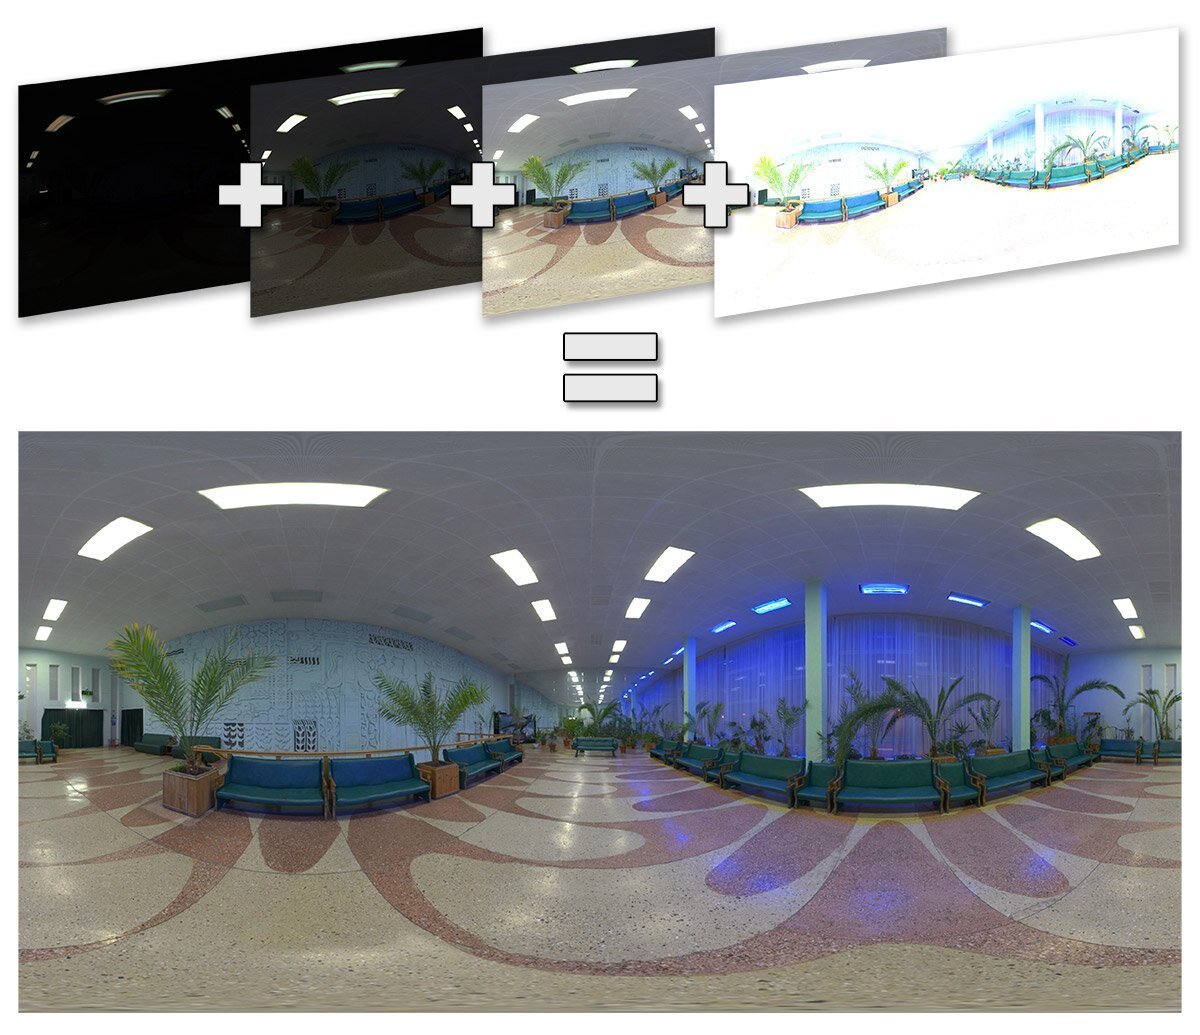
HDRI stands for High-Dynamic Range Image. Combine the same image at various exposures to make a single HDRI image. The result contains lots of detail both in the darkest and brightest areas of an image. A common JPEG image has a limited range of values (lights and darks). By combining the range of values from each image at different exposures, you end up with an image that has a greater dynamic range.
The HDRI will work as a light-emitting environment. This light will reflect off the surface of the materials applied to the objects in the scene.
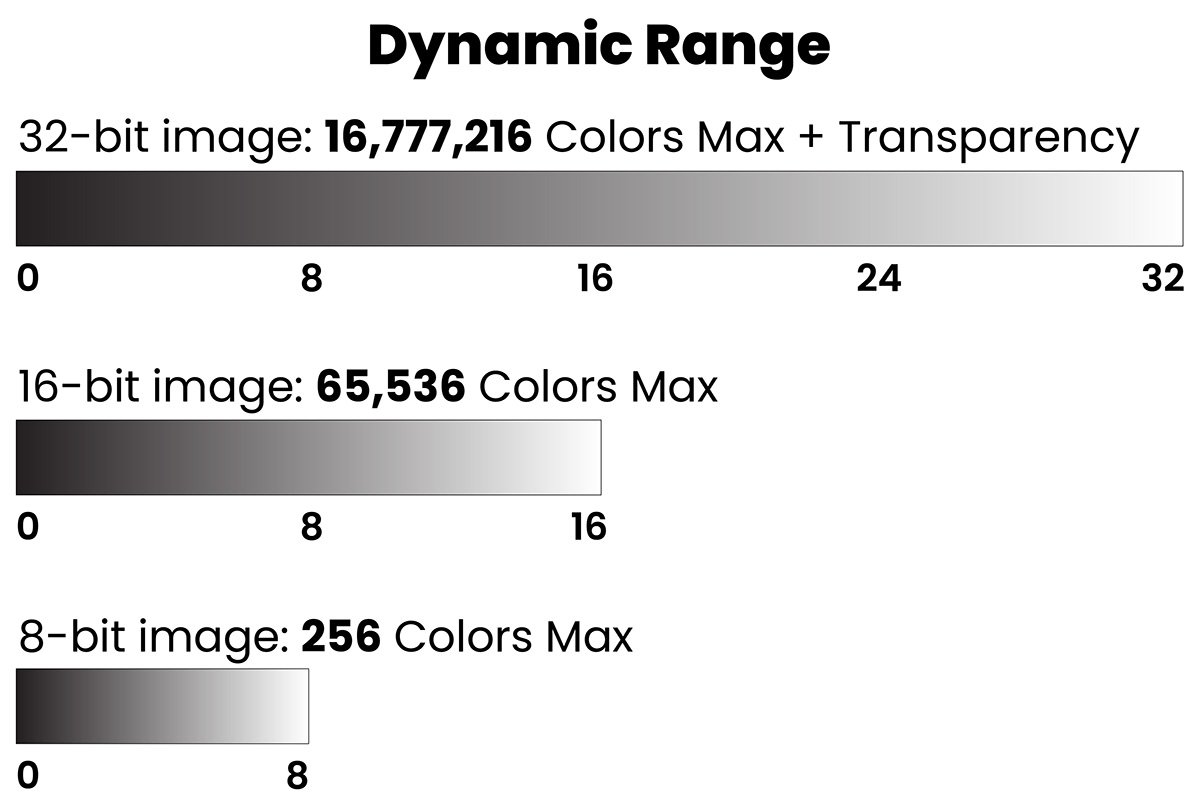
File Format
An HDRI is often contained within in a 32-bit image format. This is to contain the full range of values from the combined images. OpenEXR is the open-source standard file container used in the VFX industry to hold 32 bit images. Because of this, most HDRIs have an .EXR file extension.
Many HDRIs found in KeyShot's environment library have an .HDZ extension. This is a proprietary KeyShot format. You may export HDRIs from KeyShot as a .EXR or .HDRI file, which work with other render engines.
How do HDRIs work?
Imagine a printed photograph. A pure black ink determines how dark any part of that image can be. The brightness of the paper determines how bright the brightest part of the image can be. Dynamic range refers to the contrast, or 'difference' between the darkest and brightest part of the image.
Now, imagine a bright TV screen. Digital displays use light-emitting technology to increase dynamic range of an image. By using LEDs, parts of a TV can get brighter and appear 'whiter' than a white sheet of paper. This is why modern TVs advertise HDR capabilities.
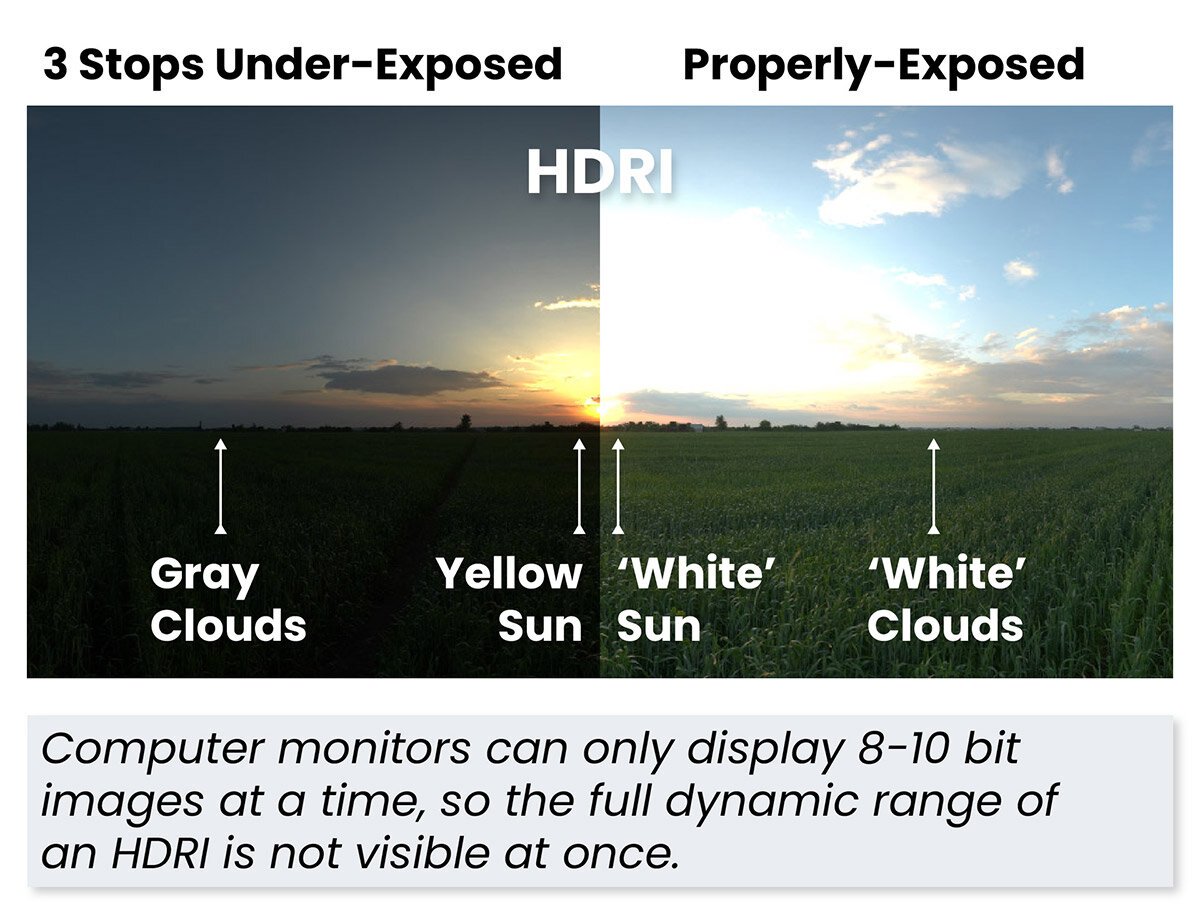
For example, an HDRI of an outdoor environment will often contain clouds and the sun. The clouds may appear white to your eye and the center of the sun also may appear white to your eye. However, in the 32-bit image, the luminance (brightness) of the 'white' sun may be 100x brighter than the 'white' clouds. Test this by opening the HDRI in Photoshop and reducing the exposure. See the example below.
Benefits of using HDRIs in KeyShot
For most beginners, the HDRI is the easiest and quickest way to light in KeyShot. In KeyShot, it's easy to drag HDRI environments into the real-time view. Upon adding the HDRI to the scene, the lighting updates. Once added to the scene, it's easy to tweak the HDRI as needed.
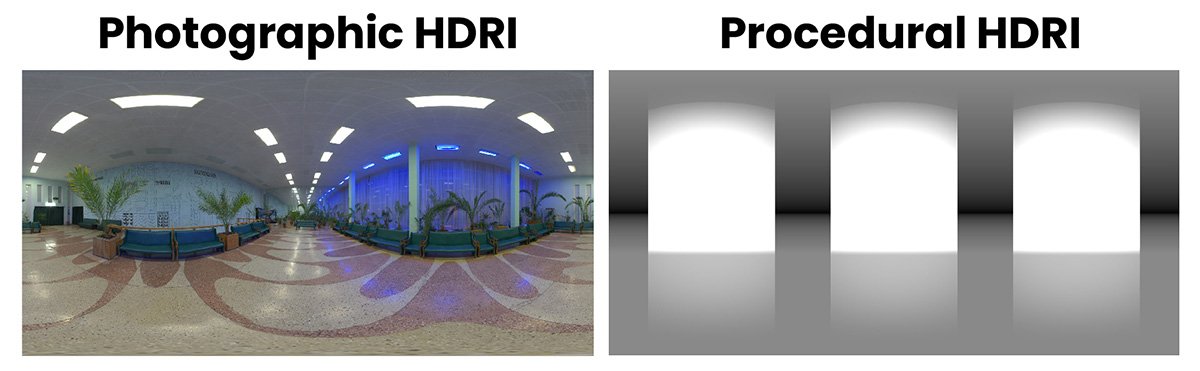
HDRIs may resemble real-world places if they're photographic environments. Photographs are used to create these HDRIs.
Changes like brightness, contrast and rotation are adjusted using simple sliders. For further control, KeyShot allows users to paint extra light sources. These pins appear as circular or rectangular white areas on top of the active HDRI.
If you want to create your own custom HDRI to best illuminate your product, KeyShot can do that too. A procedural HDRI is any one that's created without using images. These don't resemble real-world environments, but often look like abstract light booths. Because they're generated in real-time, they hardly make your KeyShot file any larger.
An HDRI is a quick way to make a product look as if it is in a real-world setting, with accurate highlights and reflections. Another benefit is that it renders quickly when you're ready to do so. HDRIs seldom produce fireflies or grainy shadows making them a great choice for producing quick, clean renderings.
Level up your KeyShot Rendering skills
Drawbacks of using HDRIs in KeyShot
For all the benefits HDRIs provide, here are some drawbacks to using them.
Increased file size
First, they make your KeyShot file much larger. High-resolution image-based HDRIs take up a lot of space for an image (often between 300 and 600mb or more) due to the bit depth (32). Every HDRI you've added to your HDRI list is saved within the KeyShot file and will add to the ultimate size of the KeyShot file on your hard drive.
Spherical distortion
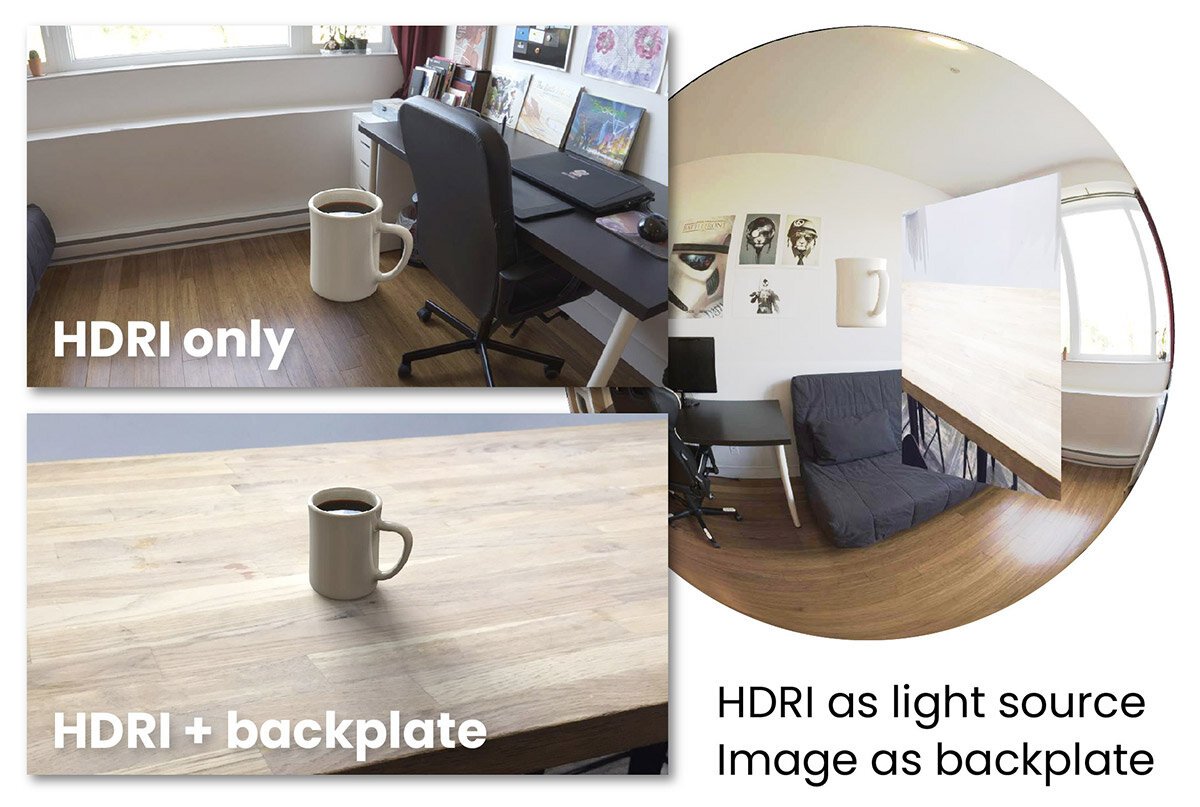
HDRIs should be used for lighting only, not for a background or backdrop behind your product. This is a common beginner mistake, but an HDRI is always spherically-mapped. This distorts the image, resulting in a round horizon line that looks odd. Also, an HDRI has to be VERY high-resolution to not look blurry or pixelated when used as a backdrop. Super high-res HDRIs are harder to find, more expensive and become exponentially larger in file-size.
Rather than using an HDRI for a backdrop, in KeyShot, you use a Backplate. Backplates are regular, 8-bit high-res stills often taken in the same location and time that the HDRI is created. This lets you dial in the HDRI for lighting, but have a handful of backplates to add context to your rendering. To achieve a more natural-appearing setting, it's common to shoot backplates with a longer lens.
Unrealistic shadows
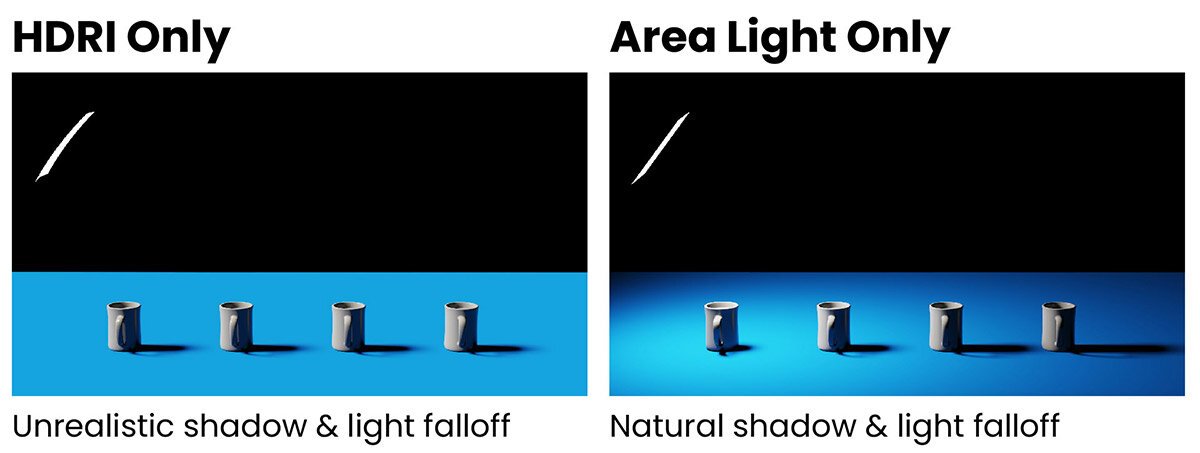
Another drawback of using HDRIs for lighting has to do with shadows. As mentioned, HDRIs are spherically-mapped images. Think of a beach ball. Now, imagine taking an image and applying it to the inside of the beach ball. Your KeyShot scene exists within the center of the beach ball.
When the HDRI casts light into your scene, every pixel of the HDRI is the same distance from the center of the scene. Thus, the light source(s) are all the same distance from the middle of the KeyShot scene. This is not how our world works, and it leads to unrealistic shadows and highlights.
The term falloff describes how light and shadows behave over distance. As light travels, it scatters and thus it appears to be less intense as it moves from its origin. The same thing happens with shadows. A shadow's shape and softness is defined by how far the light is from the object casting the shadow, as well as how big the area of light emission is. While you can control the size and softness of light sources within an HDRI, you can't control the distance an HDRI pin is from an object. The result of this that HDRIs don't produce as realistic shadows as physical lights do.
HDRI for beginners tutorial
Check out the video below if you want to learn how to use HDRIs to light your scene in KeyShot. It's beginner-friendly but will take you through a few different kind of lighting setups you can achieve with KeyShot's HDRI editor.
https://youtu.be/d6lf7bGdeKs
What is a physical light?
In KeyShot, any light that is not an HDRI is a physical light. There are five kinds of physical lights in KeyShot. Lights are materials in KeyShot, not objects. You apply thme to a physical object or piece of geometry in your scene to work.
The following are the different light materials in KeyShot:
- Emissive light - Often used for low-emission surfaces, like digital displays. Supports color textures and alpha. Emits from a surface.
- Area light - Often used as artificial light sources like studio light boxes. Supports color textures. Emits from a surface.
- Spot light - Often used to reproduce directional stage lighting. Supports stencil textures or gobos. Emits from a point.
- IES light - Used to re-create realistic manufactured lighting such as architectural light fixtures. Contains shape and falloff data. Emits from a point.
- Point light - Used to add ambient light. Omnidirectional light source. Has no surface area. Emits from a point.
When rendering products that contain light bulbs, digital screens or LEDs, it's best to go with physical lights.
How do physical lights work?
In many 3D applications, physical lights are items to be added to a scene, just like a light you would hold in your hand. In KeyShot, physical lights are materials. This means you can find them in the material library and drag them onto a piece of geometry in your scene.
If you're using a physical light that emits from a point, such as a point or spot light, whatever piece of geometry you apply the material to will disappear. This is normal. Light will be emitting from wherever that piece of geometry is located. To change the location or direction the light points, just move the piece of geometry the light emits from.
In contrast, when using a physical light that emits from a surface, such as area or emissive light, the piece of geometry you apply it to will remain visible. It turns bright white or a lighter shade of the specified color.
After applying a light material to an object, double-click on the object in the real-time view to edit its material properties such as brightness, color and softness. To shape an area or emissive light, scaling it with the move tool will control the sharpness and softness of the shadow.
Benefits of physical lights in KeyShot
Physical lights in KeyShot have the built-in benefit of adding realism in the shadow and highlight falloff. If you're familiar with photography, using physical lights will be more intuitive than HDRIs. Physical lights behave like real-world photo studio lights. Physical lights are also great for adding drama to your scene!
When adjusting the brightness of a physical light, you can use real world values like Lumen or Lux. This makes it easier to set brightness values that are appropriate for the scene and contributes to the realism of an image.
Since a physical light is a material that's applied to an object, you're able to move and rotate the object within your scene to meet your needs. This makes it easier to control where the light and reflections appear on a product than relying on an HDRI which is fixed in a single location.
Drawbacks of using physical lights in KeyShot
While physical lights are often the go-to choice of product visualizers, there are some drawbacks. Physical lights and their associated material settings can be more complex than an HDRI. Its not always easy for a beginner to know which light type is the best choice for her scene.
Physical lights make it easier to recreate real-world lighting scenarios, but if your scene scale is off, the light won't behave as expected. Even if using the correct units and value for brightness, you'll notice the lights are much brighter or darker than they should be. This is usually a giveaway that the scale of the scene is off and is much larger or smaller than it should be. To avoid issues, use accurately-scaled models.
Sometimes physical lights are tedious to set up and configure. Adding extra geometry and positioning it, dialing in the material settings and moving it to the right location can be tricky and time consuming. Especially for those with less experience.

Additionally, physical lights are prone to creating grainy shadows and bright pixels (fireflies). These can take long to resolve (if they do at all). If material settings aren't optimized, artifacts are more likely to emerge when using physical lights. Having to optimize materials and render settings to produce desirable results isn't practical for someone who needs to create quick and consistent results.
When to use HDRI lighting in KeyShot
Now that you're familiar with the differences between HDRI and physical lights in KeyShot, let's look at use cases.
Typically, you'll use HDRIs when testing out ideas or working on early iterations of a design or concept. Importing a CAD model and applying an HDRI will help to quickly give an idea of how the form will read. You can also get a sense of how different materials will look on the product. This is a good exercise before spending money on prototypes.
HDRIs are also great for consistency. If custom HDRIs are made to light a specific form factor or product, a team of designers can easily use the same HDRI every time to evaluate a product or changes made to a form.
High-volume rendering is another scenario in which it makes sense to use HDRIs. Whether automating the process though scripting or by following an S.O.P., using an HDRI is a quick way to create uniform lighting for an entire catalog of products in as quickly as possible.
In short, any time your priority is efficiency, HDRIs are the way to go.
When to use physical lights in KeyShot
Physical lights are the way to go when you need ultimate control over how the lighting looks in a scene. Whether you're using colored light sources or controlling the shape, position and size of a light, physical lights will make your job easier. If you need to animate a light's brightness, use a physical light.
Because physical lights are materials, they're easy to edit using KeyShot's Material Graph. A physical light's location is also easy to edit or animate.
Finally, if realism is your top priority, then using a physical light will yield the best results. Just remember to keep everything to scale and to use realistic Kelvin and brightness values.
Light on!
And there you have it! I wanted to shed some light (sorry) onto a subject that often brings up lots of questions among those new to rendering. By following these guidelines, you should have a solid handle on when to use HDRIs and physical lights along with the pros and cons of each.