KeyShot Render Passes Compositing Tutorial
What is compositing?
Oversimplified, any time you stack up images or videos to make a new image you are compositing. Compositing is most often used in the world of visual effects (VFX). When you see a character hanging onto the edge of a building by one hand, their feet dangling 200 feet above a busy New York street, Hollywood magic is used to create that shot. First, a video of a busy city street is filmed and this is often called a plate. Then, the actor is filmed hanging off of an 8-foot wall with a big cushion under neath it. The two images get combined to safely show our hero in a perilous situation. Compositing is the art of combining footage from various cameras or render engines to create a complete scene.
Benefits of compositing
Who doesn't like options? The most common reasons someone might want to composite an image as opposed to rendering it as a single still right out of the rendering software is flexibility. You might want to change the color of a background, or easily remove a product from the background of an image. Perhaps different labels, logos or artwork will be incorporated into the image. Whatever your reason, compositing with render passes will usually make the job easier.
The two most common reasons clients asked me for layered PSD (Photoshop) files was so they could place different images within picture frames, or so they could use a rendered product in a number of different pieces of media for marketing campaigns. When I hand over a PSD with render passes, it's easier to use each pass to aid in making selections, masking or adjusting the brightness or color of different parts of an image.
Drawbacks of compositing
While compositing with KeyShot render passes does offer some flexibility, there are some drawbacks. First, the composited result or edited image my not be as truly physically accurate (read realistic) as the final rendering produced by the render engine. For products that must be presented accurately and realistically, artistic license is not helpful.
Next, compositing is slow. It requires you to manually load multiple images and merge them together, a process that is automated with your render engine.
And then there's hard drive space. Compositing leads to multiple images being rendered out, which will eat up hard drive space too. In order for the compositing to work correctly, these need to be in 32-bit file formats which are also much larger than their 8-bit counterparts.
Lastly, you run the risk of running into bugs. Sometimes, render passes don't render out correctly. I've found this to be true with KeyShot. When you then go to composite them, the composited image may not look correct.
What render passes does KeyShot offer?
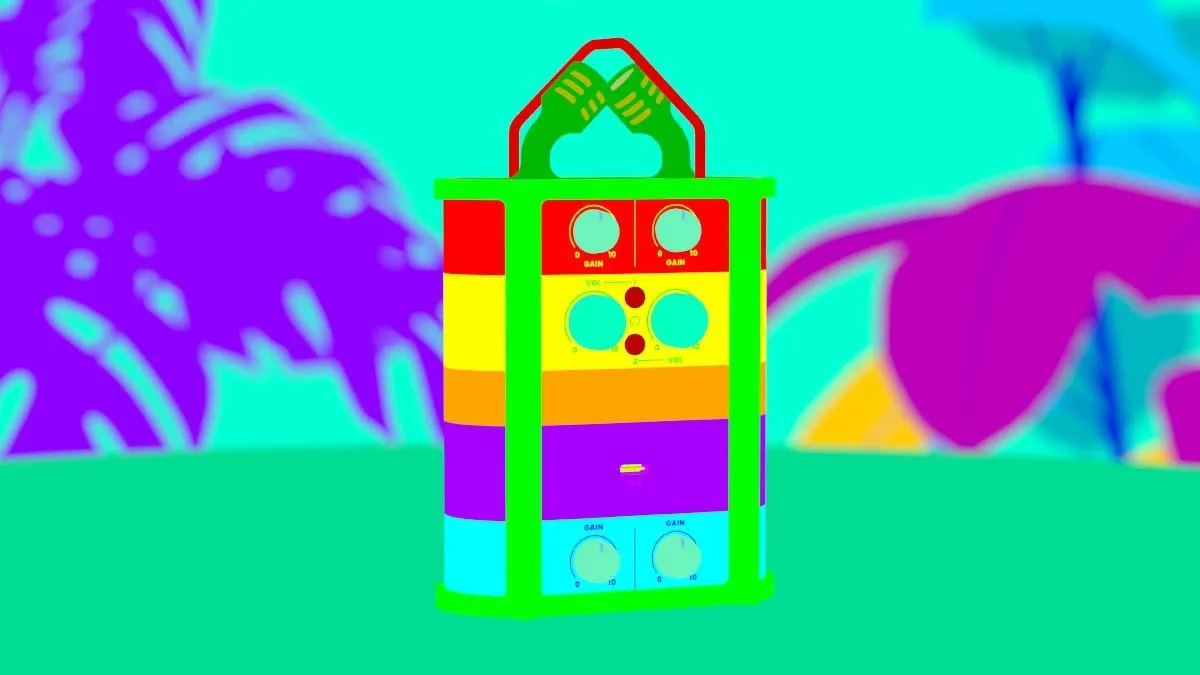
KeyShot is able to output a variety of render passes. Some of them are needed to reconstruct an RGB pass (beauty pass), others are simply used to make further editing of the image easier. Below is a list of each render pass available to KeyShot users.


Known issues and limitations in KeyShot
Unfortunately, I've run into a few scenarios in which render passes don't render out correctly. Some specific materials and light sources cause issues with KeyShot render passes. While I can't say this list accounts for every scenario, here are a few I've run into. I'm hoping they'll be addressed in the near future.
Originally, this scene was lit with area lights and some translucent materials. Both of those posed issues when I tried to rebuild the image with render passes. I had to switch to lighting this scene with HDRI lighting only as well as swap out some material types to plastic. Below are some items to watch out for:
- Area light reflections - not accounted for in some render passes
- Image adjustments (including denoise and firefly filter) do not affect render passes
- Specific materials do not look correct when composited from render passes
After some quick testing, I assigned each non-light material to a cube within an array of cubes. I rendered the scene in CPU mode and upon compositing the rendered image, there were quite a few cubes that didn't match the rgb pass. This could be for a number of reasons, but with limited time to test, I have to assume the following materials are not optimized for re-building with render passes:
- Flat
- Paint
- Thin Film
- Translucent
- Generic
- Metallic Paint
- Realcloth
- Scattering Medium
- Translucent Medium
- VelvetToon
- Wireframe
- Xray
While that's a pretty long list, I'm only including it in case you're experiencing issues using one of these materials. Further, some of these non photo-realistic materials would not use all the same passes or blend modes to create an rgb pass. This is because they're not physically-based materials (such as wireframe, toon, xray).
Level up your KeyShot Rendering skills
How to create render passes in KeyShot
So, this is super easy! When you're ready to create your final rendering, head on over to the Render Output dialogue. Under the Layers and Passes accordion you'll see all the options. If you wish to render all the render passes, you can tick that box. Otherwise, you can manually tick the box next to each pass you wish to render.
If you want all your passes to end up in a tidy, layered PSD document, you must do two things: First, choose PSD, PSD 16-bit or PSD 32-bit for image format. Second, tick that checkbox under the render layers called 'Add to PSD', otherwise you'll get a ton of PSD files. Why this isn't automatic is beyond me.
Which image format to use when rendering render passes
While PNG and JPG are probably the most common image formats used for casual rendering, you don't want to use those formats for render passes. If you will be doing actual compositing, you need to stick with a format that uses linear gamma and is 32-bit. Now, I know that sounds complicated (and it is if you want to dig into those two topics) but for now all you need to know is to render either PSD 32-bit or EXR image formats.
Because KeyShot does not support multichannel EXR, PSD is the only format that can contain all the KeyShot render passes in a single file. If you plan to do your compositing in Photoshop, there's no reason to choose EXR format. If you plan to composite your image in a different software, then EXR is the way to go.
EXR is non-proprietary and often used in VFX pipelines and can be read by many software. It's also worth mentioning that if you plan to open EXR images in Photoshop, you'll likely need a free plugin called EXR-IO. This plugin allows me to not only open EXR images in Photoshop, but gives me a bunch of options on how to handle the file when both opening and saving EXR images out of Photoshop.
How compositing works
Compositing is just a matter of taking your KeyShot render passes (or passes from any program), stacking them in the right order and telling the software how each layer or image should interact.
Blend modes
In most software, the term blend mode refers to how each image will interact with another image. You'll find these in both layer-based programs like Photoshop, Gimp and After Effects as well as node-based compositors like Fusion, Nuke or Natron.
Blend modes have fairly intuitive and conventional names for mathematical operations that happen between each image. For example, Linear Dodge, or Add both describe an operation in which the bright areas of one image are added to another. Black areas get ignored because black is represented by a numerical value of 0. This article on blend modes goes deeper on how they work and covers more of them.
Bit-depth and color space
Color spaces and bit depth are both are two very technical topics. I have other articles that will tackle this topic soon. Though, I did touch a bit on dynamic range in this article. In the meantime, you here's what you need to know to be dangerous. KeyShot render passes will only composite correctly if 3 conditions are met.
- They must be rendered correctly (bug-free) and there's nothing you can do about this, so we'll assume KeyShot will do this.
- They must be in 32-bit, linear color space
- The proper blend modes must be assigned to each pass
By rendering at PSD 32-bit or EXR, KeyShot will produce images that are by default 32-bit and in a linear color space. Even if you don't know what those mean from a technical standpoint, the render passes will work for compositing. This means the only thing you need to do is set the blend modes properly and you'll be off to the races.
How to composite an image using render passes in Photoshop
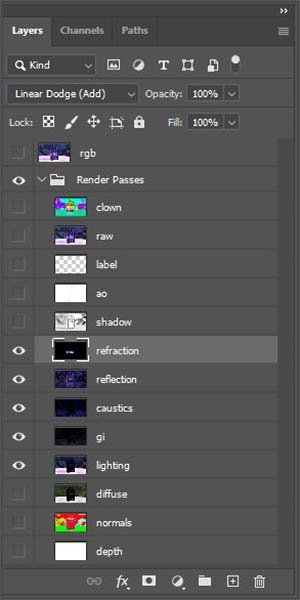
This is probably way simpler than you thought. Since you'll be compositing in Photoshop, I'll assume you rendered a layered PSD. If that's the case, open it in Photoshop and expand the render passes folder in the layers panel to see all the KeyShot render passes.
If you rendered passes as EXR or forgot to add to PSD, you can use this feature in Photoshop to load the files in a stack: File>Scripts>Load files into stack (you're welcome)
Before proceeding, make sure your Photoshop document is indeed in 32-bit mode. You can check this by clicking on Image>Mode and seeing a checkbox next to 32-bit
Next, turn off all render passes except for the following:
- lighting
- gi
- caustics
- reflection
- refraction
Now, set the blend mode of the following layers to Linear Dodge (ADD)
- gi
- caustics
- reflection
- refraction
Finally, grab your render pass called rgb and drag it to the very top of your layer stack in Photoshop. Toggle it on and off to see if your final composite matches the rgb pass. If so, then success! Your composite is a match to the rendered image that KeyShot created.
If not, don't panic quite yet. Last time I checked, the KeyShot 10 online manual shows some discrepancies especially with some transparent materials even when composited correctly.
Why the composited image doesn't match the KeyShot rgb pass
Unfortunately, the composite doesn't always match the rendered rgb pass. This could come down to one or more of the known limitations or bugs mentioned above. First, double-check your blend modes. Next, make sure you haven't changed any of the exposure, gamma or contrast settings in the image styles tab. Those changes won't be saved to render passes, only your rgb pass.
If the two above are correct, then the discrepancy likely comes down to an incorrectly-rendered KeyShot render pass or a material that's not supported in KeyShot render passes. If this happens, reach out to Luxion Support to let them know of the issue so they can fix it in a future update of KeyShot.
Is compositing with render passes from KeyShot worth it?
After all that, you should feel pretty confident when it comes to compositing KeyShot render layers in Photoshop. But the ultimate question is whether or not it's worth the trouble and extra work and hard drive space. Honestly, in most cases for most users, I don't think it's worth it. Sometimes, an edit must be made and rather than re-rendering an entire image, render passes can be used to make a change in post. In the earlier examples, I mentioned a use-case in which an image will be re-appropriated for various media. In that scenario, having a layered image full of render passes makes sense.
When it comes to animation, compositing is much more common. Because animations are often 24-30 fps (frames per second), you need to render a new 24-30 images for ever second of animation. This takes enormous resources and time. Render passes can be used to make changes to animations that would be too expensive to re-render.
What else can be done with render passes?
Render passes can make your life easier when editing final renderings. I try not to lean heavily on post production, but every once in a while, it's necessary. Here are 5 ways I like to use render passes to push my renderings a bit further.
Here's a short tutorial running through how you might make use of KeyShot render passes to enhance a rendering. I cover the 5 examples outlined below as well to show you how I am most likely to use render passes in Photoshop.
https://www.youtube.com/watch?v=YoDQ3F9S6s4&ab_channel=WillGibbons
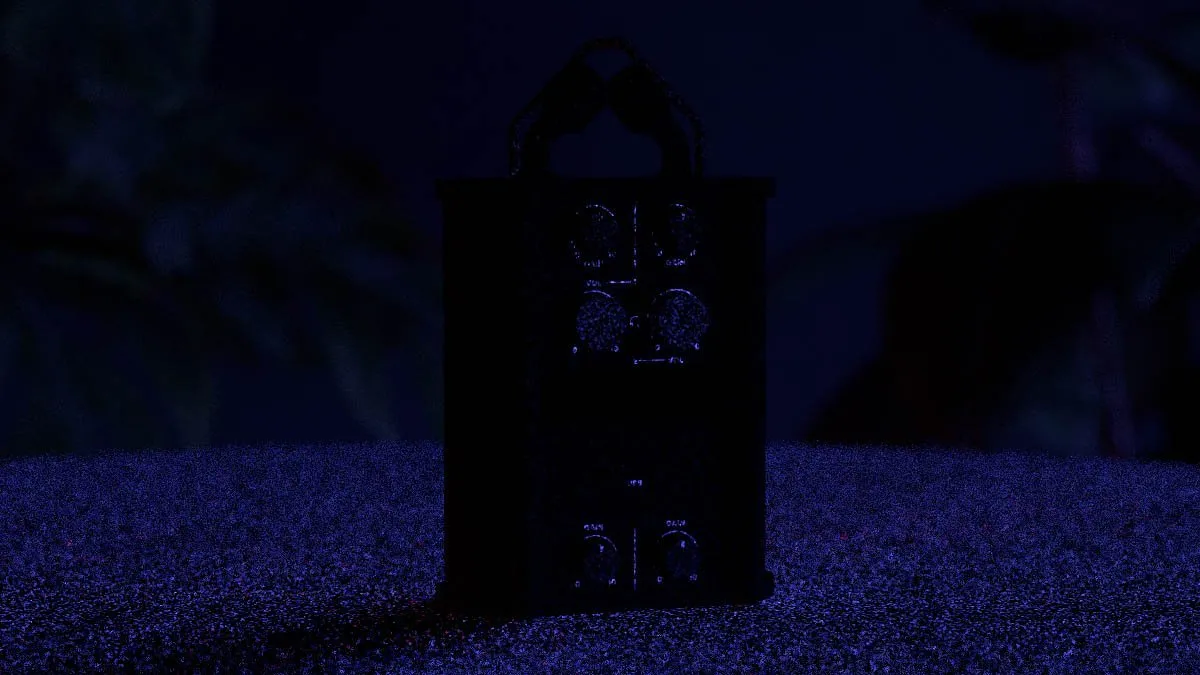
Adding depth of field
While the depth of field that KeyShot generates will be more accurate and better looking, it is possible to use a depth pass to blur out part of an image and simulate depth of field. The depth pass begins as a 32-bit image and must be tone mapped to create a grayscale image. This can be done by using the 'HDR toning' command in Photoshop. The 'Equalize Histogram' preset usually provides the best results with no extra tweaking. After this is done, copy and paste the result into the a new channel in the original document. Finally, with the target layer selected, choose Image>Blur>Lens Blur and adjust the settings as desired.
Adding or subtracting light
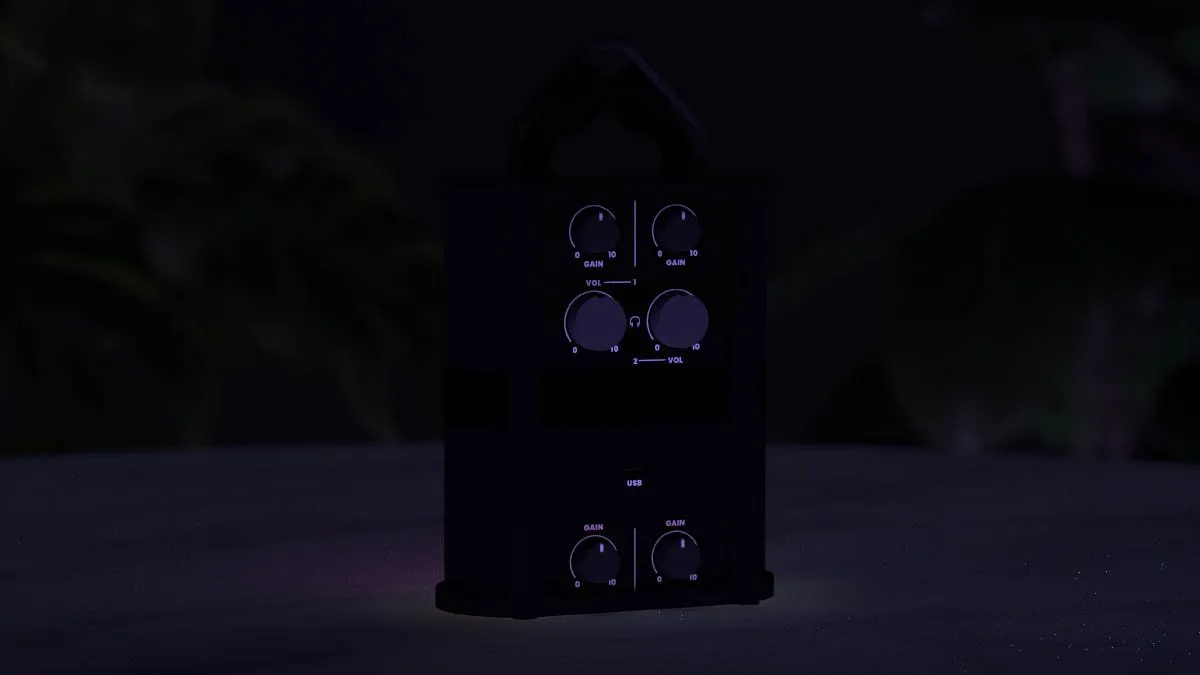
Each render pass contains the result of different light calculations. For example, caustics, refraction and reflection passes all contain only the light that is rendered as a result of these phenomena. Sometimes you want to emphasize one of these characteristics of your image to make it nicer looking. This is easy to do with render passes and blend modes.
To add light, grab the render pass containing the light you want to add, then drag it above the target layer, which will likely be your rgb (beauty) pass. Select the render layer to be added and set the blend mode to Linear Dodge Add. This will add the light to the target layer without applying a gamma curve. That is to say, as light gets added 'in real life'.
The result of this will likely be too bright, so use the opacity slider to dial back the result until it looks good.
The exact opposite of this can be achieved by following the above steps and using the blend mode called Linear Burn.
Making selections
Making selections with a clown pass and magic wand too is pretty straight-forward. However, to make this both less destructive and easier, I prefer to use adjustment layers and layer masks. Rather than manually selecting multiple fields of color with the magic wand tool, you can use the command select>color range. Use the eyedropper to target a color and anywhere it appears on your image, those pixels will be selected. Use the fuzziness slider to expand the threshold of what colors will be selected.
Once your selection has been made, select the target layer. Now, any adjustment layer you add will have a layer mask automatically applied based on your existing selection. The layer mask can easily be adjusted by painting black or white pixels with a brush. This allows you to paint in or paint out effects.
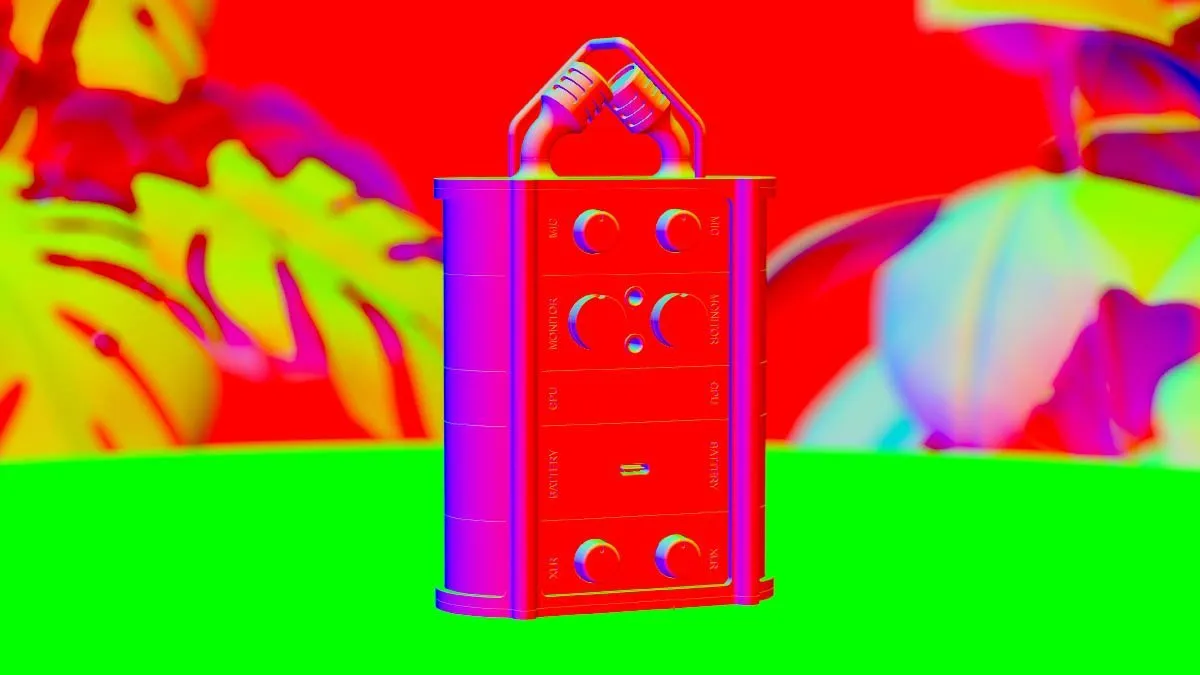
Changing lighting direction
Sometimes you want to emphasize or reduce the amount of light on your scene from a specific direction. This can be achieved easily enough using a Normals pass and an exposure adjustment layer. Or, another option would be to adjust the color temperature or hue of a light coming from a specific direction. You'd achieve this the same way I just mentioned but using a hue adjustment layer.
Making an image easier to read
Finally, sometimes you want to use a render pass as a means to stylize your image. This isn't an attempt to make the image more realistic, but to achieve a specific look. Whether you want to add contrast to small details or create outlines of specific parts, this is where your creativity will come in handy. There are lots of ways to use render passes and your results are only capped by your own creativity.
Please keep in mind
Ultimately, I created this post and tutorial because of the numerous requests I received asking for how to do re-create an rgb pass using KeyShot render passes alone. I can say that as a professional, I seldom use this method of rendering to create a final image. I've found that there are too many bugs and limitations with KeyShot's output and the extra time it takes is just not worth it for me personally.
A more likely scenario is that I'll render a final image as an EXR to have access to the extra dynamic range and then I'll render out an additional one or two passes, like a caustics, reflection or shadow pass. I'll then use those two extra passes to add a little bit of polish to the final image. That said, understanding what it takes to composite an image has definitely come in handy, and I hope you've found it helpful and interesting.
Until next time, happy rendering!