Gamma Vs. Linear Workflow for KeyShot Users

Can KeyShot users create better images, if they understand Gamma and Linear Workflow? I think so, yes. But can you explain why? If not, this article was made for you.
When does a linear workflow make sense?
Linear images produced with a linear workflow are technically more correct. But it comes at a pretty high cost to users, both in complexity, managing assets and file size.
A linear workflow could be useful for:
- If you care a lot about color consistency of assets, especially scanned sources. For example, in KeyShot the AXF material type stores textures linearly.
- If you do extensive compositing, especially across different source types. For example, mixing lots of rendered images from different render engines, or photos and video assets from different cameras.
If neither of the above applies to you, then I think it’s more trouble than it’s worth.
I wanted to share my conclusion of this article up-front so as to not waste anyone’s time. This is a long article with lots of information. Even if you aren’t someone who’s likely to need to adopt a linear workflow, the following article should answer a lot of questions that you’re bound to wonder as you grow as a digital artist.
Why you should understand gamma
After seeing the words Linear Workflow and Gamma come up time and time again, I began to wonder if I as a KeyShot user could benefit from understanding these. Afterall, it seems like you can’t throw a rock without hitting a forum where some VFX guru is going on about Gamma this and Linear that.
After tons of digging, asking questions and some trial and error testing, I think I have enough information to try and address the question:
“Can KeyShot users create better images, if they understand Gamma and Linear Workflows?”
Digital light & color are complicated
I’ll admit that I was allowed to graduate design school knowing very little about digital color. CMYK was used for print and RGB was used for everything else. That was about the extent of my knowledge on digital color back then.
However, the way humans see color, which is a sliver of the electromagnetic spectrum (a.k.a light) is organic. Our digital cameras and render engines that create images, and digital screens that display our images are not organic.
The way our devices have come to display images over the years has evolved with changes in technology. However, there are some ‘legacy artifacts’ still present in how digital color is handled left over from the days of analog media, such as film.
To understand how digital color works today, we should understand how images were displayed on TVs back in the film era.
Definitions of relevant terms
I try to keep things simple. But to fully grasp this article and get some value from it, you’ll need to understand a few terms that we don’t often use in every-day life. If it makes you feel better, I had to do my homework on these words too. I’ve done my best to provide simple definitions of these relevant terms below. Keep reading, it’ll all click when we’re done!
What is a color space?
A color space is a specific organization of colors. Gamma and linear are two examples of color spaces. They're useful when describing the capabilities a device has of representing colors. When an image's color space matches the capabilities of a screen, the screen should display that image correctly.
What is chromaticity?
Chromaticity is used to describe a color, independent of brightness. This means hue and saturation, but no luminance. Removing brightness from the equation helps create reference points, since ‘color’ changes when changing the brightness of a display for example.
What is gamut?
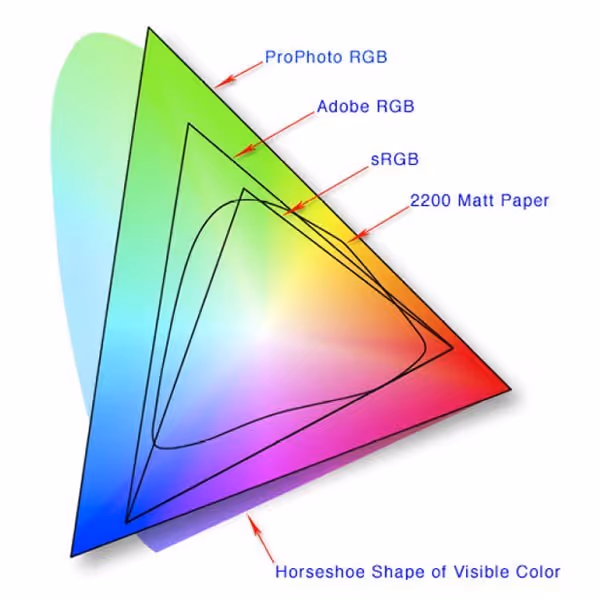
A color gamut is a complete range of colors within a color space that can be reproduced on an output device, such as your monitor.
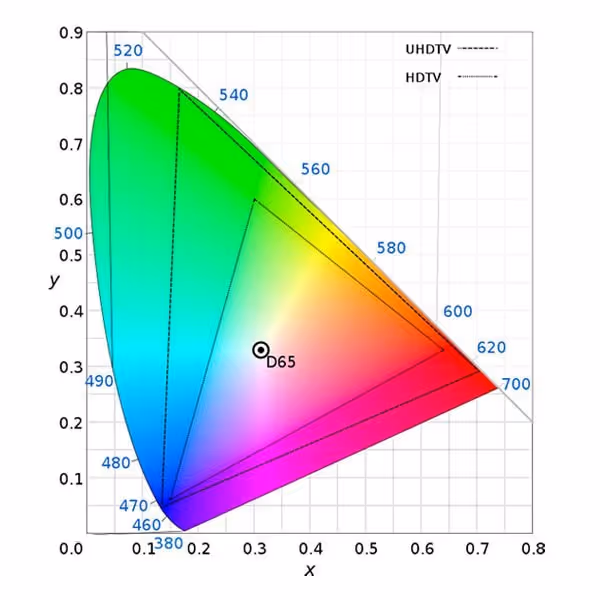
What is a white point?
A white point is a set of chromaticity coordinates used to define the color white. D65 is a commonly-used white point. When viewing the gamut of a color space, it’s important to understand what is considered neutral white, especially when comparing and working with different color spaces.
linear color space Vs. sRGB color space
The color space of an image as well as a display device will affect how images interact with other images as well as how images colors and brightness appear to us. A display device could be a physical display like your phone’s screen or a digital display such as the preview window within a video editing program.
What is linear color space?
A color space is linear if doubling any value in that color space results in a color that is twice as bright. You probably think this feels expected or intuitive, and I’d agree!

With simple math, we can say 2 + 2 = 4. If we assign numbers to a grayscale value, where black = 0 and white = 1. We'll take the exact shade of gray (value) associated with the number .25 and we'll add it to itself. If we do this, it will become twice as bright as long as we're in a linear color space.

This is how light works in the real world. It also makes things easy when compositing or doing post-processing with rendered images. The result of working in a linear workflow is a more realistic outcome.
Finally, you should know that not all linear color spaces are identical. Each linear color space is defined by its basis. For RGB, this is RGB chromaticities and white point. Compositing with data from different non-linear color spaces can create based results. White point and chroma coordinates must be tracked and accounted for in each source.
What is sRGB color space?
sRGB is a non-linear color space because doubling any value within an sRGB color space will result in a color that is not exactly twice as bright. Rather than a linear progression of brightness in this color space, there is a curve applied to the brightness.

sRGB is the most common color space and is a standard that HP and Microsoft collaborated on in 1996 to use on monitors, printers, and the web. sRGB is often assumed to be the color space for images that contain no color space information.
Level up your KeyShot Rendering skills

Why aren't monitors linear?
If lighting in the real-world works linearly, and linear math is simple, then shouldn’t we just make all images and monitors linear and be done with it?!
No. If it were that simple, we probably would have already.
First, our eyes do not respond to light in a linear fashion, and the second reason has to do with how televisions and monitors originally worked.
Human perception is not linear
Our eyes have an uneven distribution of cells and photoreceptors responsible for seeing color and light. This means our eyes are more sensitive to seeing specific colors and levels of light. For example, we can detect small changes in brightness at the low end of the spectrum, or in the dark more easily than in the bright light.
Applying a curve to luminance in digital images captures more detail in the dark areas and more closely mimics how our eyes see the world around us.
How early TVs worked
CRT (cathode ray tube) displays used a beam of electrons to generate light. The strength of this electron beam varied, and thus the brightness did too. The variation of this brightness was not linear and did not produce a visually-correct image.
To compensate for this, TV broadcasts were modified by adding a curve (in the opposite direction) to cancel out this uneven brightness from the electron beam. The resulting image would be displayed linearly, making it look correct to our eyes.
What is gamma correction?
"The term for this process, de-linearizing an image to compensate for a non-linear display, is called gamma correction." - Jason L. McKesson [1]
Even though we ditched CRT displays long ago, the media, cameras, software, operating systems and more have continually been developed with gamma correction in mind.
Even if we had linear displays, none of the media we use or consume would be displayed correctly on them because nearly all media gets gamma-corrected along the way by software.
So, despite knowing that a linear workflow and color space are ideal for CG, VFX artists and filmmakers, we have to live with and accept that our work must be gamma corrected to display properly on any digital display in the end.
How does gamma space work?
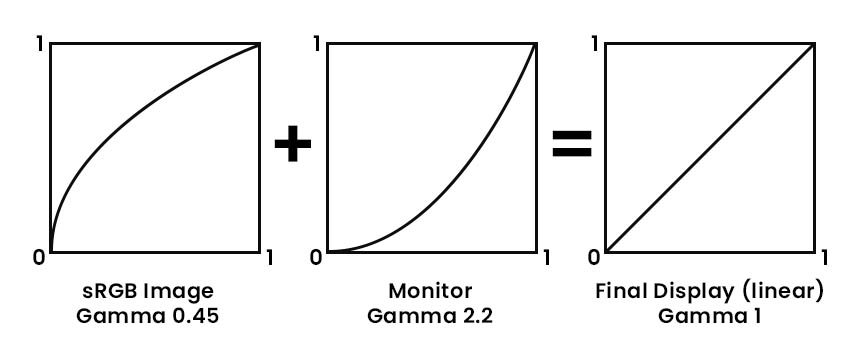
The original CRT displays rendered light in a non-linear way. This is represented by a curve on a graph. It's referred to as a gamma (a form of light) curve and 2.2 represents the function or shape of this curve. In other words a gamma curve of 2.2 is how we mathematically describe the non-linear way a monitor displays light.
For an image to appear correctly on a monitor with a gamma of 2.2, the image is often stored with a gamma of .45, which is the reciprocal of 2.2. This is what the original TV broadcasts did to get their image to look correct on a CRT-TV. They applied a .45 gamma correction.
In linear space, neutral gray would be .5, but in gamma space, it is dependent on the gamma curve. With most images being stored with a gamma of .45, their neutral gray is about .73.

If we perform the same exact math from our previous example, in a non-linear color space, the math does not give us the results we expect. A non-linear color space produces different results because of the gamma curve.
How do color spaces affect your rendering pipeline?
You've probably heard of 'linear workflow' and that it's important. In practical terms it means that great care is taken to avoid using any gamma-correction at the wrong time throughout the rendering process. Remember, gamma correction should occur once to an image to compensate for the monitor it's being viewed on. But oftentimes, images are saved with gamma correction before we even use them. And what do we use images for in rendering? Textures. Right. Oh, crap!
If you use an image that's already been gamma-corrected for a texture, then the resulting rendering will be inaccurate. The render engine will calculate light linearly. However, the appearance of the shaded geometry won't be physically accurate. This is because the light will have been added to a gamma-corrected texture.
Your final rendering will also likely be gamma-corrected when saving the image, which might hide some of these inaccuracies. However, 'pretty accurate' is not good enough for some, especially with color-sensitive work and when chasing realism. This is why a linear workflow was developed.
Physically-based rendering linear workflow
The linear pipeline describes the steps taken to ensure gamma correction is applied only at the correct stage/s in the process of image making. Things like textures, backplates and video maps need to have their gamma correction removed before being used in a render engine or compositing tool. This puts them in linear space.
Please note, that each render engine is different and KeyShot assumes users are NOT taking steps to linearize their data. This means once again, that you are not expected to adopt a linear workflow to get usable images out of KeyShot.
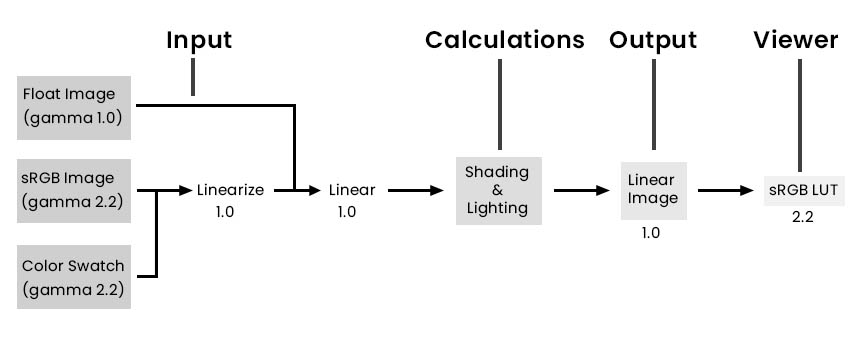
With a linear workflow, the input textures are already in linear space and the render engine shades linearly too, resulting in an accurate result. The final image will be gamma-corrected depending on its output format.
However, if the rendered result will go on to be composited with other linear images, then, care must be taken to render in a format that does NOT apply gamma correction. In KeyShot, the easiest way to do this is to render an EXR format. Alternatively, you could render a PNG or JPG but you must adjust the gamma in KeyShot's image tab to a value of 1.
This way, if you're going to do any post-processing to your image or compositing in another software, you're working with linear footage. Blend modes often used in compositing, will work correctly. The absolute final step in the process before you export your linear image or video is to apply the gamma curve so the result will display correctly on a screen.
I’ll point out that Photoshop is not an ideal tool to use for compositing or gamma correction. Photoshop just doesn’t make this easy, nor are there many useful tools inside it for this.
What are blend modes?
When taking multiple images or footage from cameras and combining them, blend modes determine how these layers interact. For example, if you render a video of a fire and you want to place it in front of a video of a person, you need to combine these two clips. Let’s say one of them is live-action footage captured by a camera, the other is CGI, rendered on a computer.
The way these two clips are combined is called compositing. The fire clip will be placed on top of the live-action clip. But since we need to see the person behind the flames, we need to choose a blend mode that will allow that to happen.
Linear add is a common blend mode that would be appropriate in this situation. However, as the name suggests, this blend mode assumes both clips are linear. If either one has been gamma-corrected, the result will look unnatural. Most blend modes used in common editing software assume linear images or footage.
How is gamma and linear workflow handled in KeyShot?
So far, all the information I’ve shared with you is general and is not application-specific. However, different applications do indeed handle gamma differently. KeyShot has very little official documentation on this subject, but through various conversations I’ve had with Luxion both as an employee and as a user, I’ve been able to gather the following.
KeyShot uses a gamma of 2
If you render with a basic image style, you’ll get an RGB image with sRGB chromaticities and D65 white point, but with a gamma of 2 (not the common sRGB gamma of 2.2). Image styles were introduced in KeyShot 9. A basic image style is equivalent to what KeyShot created by default before image styles were introduced.
Why does KeyShot use a gamma of 2 instead of the common 2.2? I can only speculate. But in photography, an EV or exposure value is measured in stops. And 1 stop leads to a doubling of light, or a factor of 2x. So, maybe that’s where the gamma 2 came from?

KeyShot uses linear RGB internally
The light that KeyShot simulates is converted to colors and the resulting color is treated as linear, allowing KeyShot to render light accurately. The gamma of 2 is applied to the data so the image we see on screen looks correct to us.
KeyShot assumes textures have a gamma of 2
When loading textures into KeyShot, it always assumes textures are encoded with an sRGB-like color space with gamma of 2. However, since what KeyShot displays to you (in the real-time view) uses a gamma of 2, these two actions essentially cancels eachother out. This is why you’re not likely to notice your textures looking ‘off’.
To force KeyShot to read your texture as linear, you’d need to add a color contrast node in the material graph and set its contrast to 0. This assumes you're using a linear texture though, so doing this with standard jpg or png textures that are not specifically saved in a linear format will not yield good results.
Is it possible to adopt a linear workflow in KeyShot?
While possible, it’s not quite practical to do so. KeyShot is largely designed to relieve you from having to worry about keeping things linear.
Generally speaking this is how you’d do it:
- Save all artwork, textures or image-based assets in linear sRGB. This would require using a program to strip this media of any gamma curves. You’d need to ensure whatever format you save it as does not re-apply any curves to it.
- In KeyShot, any textures being used will need to have a contrast of 0. This is done by adding a color adjust node in the material graph and setting its contrast value to 0.
- Render your final image or frames from KeyShot as EXR, which will by default be a linear format.
- In your compositing software, your KeyShot-rendered EXR should now be correct, so long as your compositing environment is working in full-float 32-bit linear space.
So, what do you do with this information?
Hopefully you learned a lot here. Sorry for the length! If you’re not the person who needs to use a linear workflow to ensure your final renderings meet specific requirements, then just carry on using KeyShot as you always have.
However, if at any point, you’re wondering why an image or texture isn’t working right, you now have some information to help troubleshoot. Maybe you’ve output some render passes from KeyShot and need to reconstruct an image using those passes. Your new knowledge about blend modes and color spaces will certainly help you get the right results. If you want to learn more about compositing with KeyShot assets, visit this article here.
And if you ever ‘graduate’ from KeyShot or make a career move that has you working with other tools from the VFX industry, then you may have just gotten a head start on something you’d eventually have to learn.
Until next time, happy rendering!
** If I’ve gotten any of my facts wrong, please shoot me an email. I did my best to be accurate here, but I am only human.
References & Resources
- https://paroj.github.io/gltut/Illumination/Tut12%20Monitors%20and%20Gamma.html
- https://www.kinematicsoup.com/news/2016/6/15/gamma-and-linear-space-what-they-are-how-they-differ
- https://learnopengl.com/Advanced-Lighting/Gamma-Correction
- https://forum.reallusion.com/308094/1-PBR-Linear-Workflow
- https://realuca.wordpress.com/2015/10/13/color-and-light-linear-and-log-human-vs-video/
- https://manual.keyshot.com/manual/preferences/color-management/