7 Tips to Make a More Realistic Rendering

As technology advances, we’re armed with the tools to create stunningly-realistic computer-generated imagery (CGI) while being un-bound by the laws of physics, budgets, or cameras. Designers use rendering software to create photo-real CGI to gain support for a concept far before physical prototypes are available.
CGI allows us to create renderings and animations that make hair stand up and heart rates increase. Creating beautiful, imagery that elicits an emotional response plays a big role in successful product launches and advertising campaigns. This article is the ultimate guide on how to make a more realistic rendering.
While each 3D rendering software is unique, they all share many similarities. The strategies in this article can be applied regardless of the software. While buttons, tools and technologies may differ slightly, each technique outlined below should be possible within your software of choice. Also, since we’ve gotten so used to seeing our world through photography, many techniques here will be focused on reproducing traits of photographs. All of which should help you create a more realistic rendering.
1. Geometry
It all starts with a set of 3D data, or a model. If you’re the creator of your 3D data, you’re in luck! You can ad as little or as much detail as you’d like. The more detail the model contains, the more realistic the rendering is likely to be in the end. Adding these details to a model will set you down the right path for a photo-real image.
Scale
Your model should be built to real-world scale. This ensures textures, light and depth of field will behave more naturally down the road.
Clearance
In the real-world, multi-part products have small space between each piece in the assembly. The distance between parts (especially moving parts) are called tolerances. Use accurate clearances for best results.
Manufacturing Defects
Our tools have limits and are imperfect in the real-world, so if we can capture those limits or imperfections in our 3D models, they’ll look like actual, man-made products.
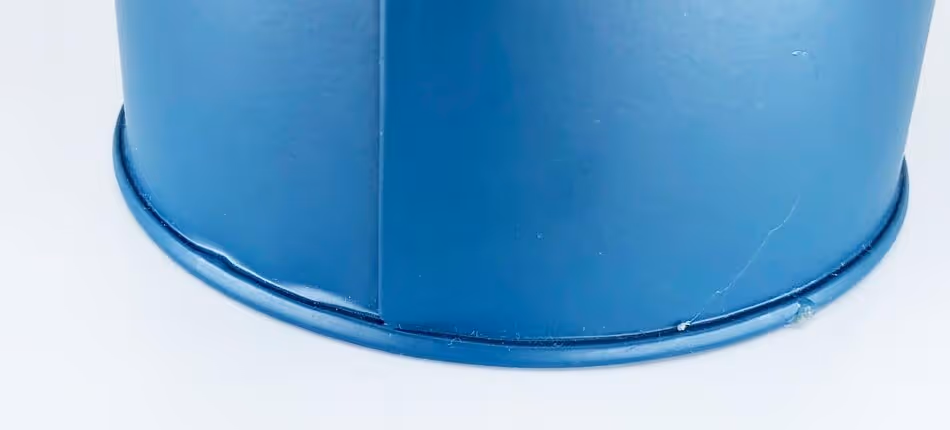
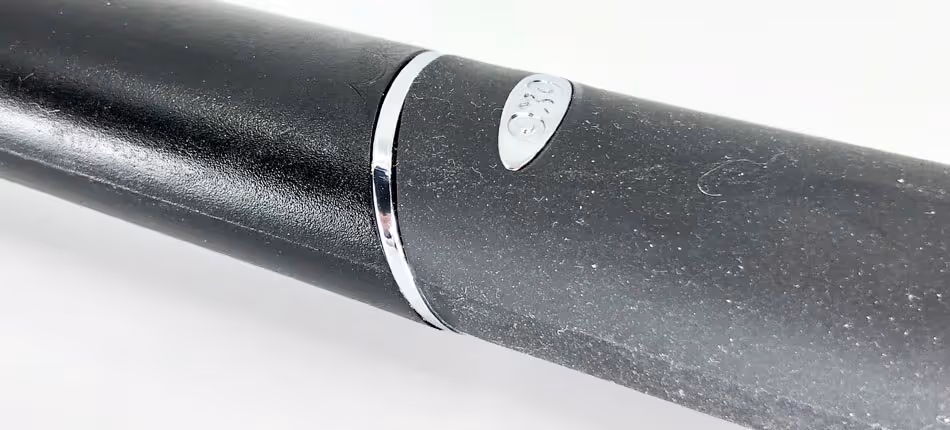
Die, Mold or Part Lines
Anything created using a die or form will have part lines when it comes out of the mold. More expensive products may not have visible mold lines if an additional process is used to remove them. Having visible mold lines can make your product look very real.
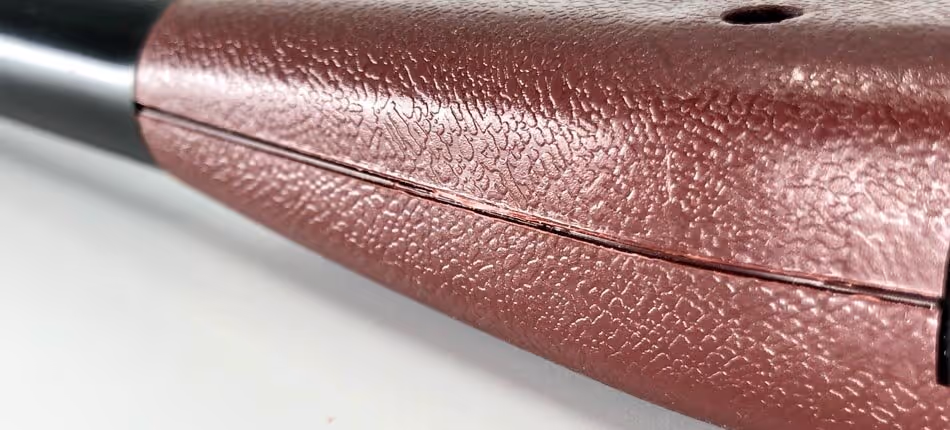
Inconsistent Offset
Having slight inconsistencies in tolerances, angles, rotation, placement and thickness (even if just barely noticeable) will bring your 3D model to life.
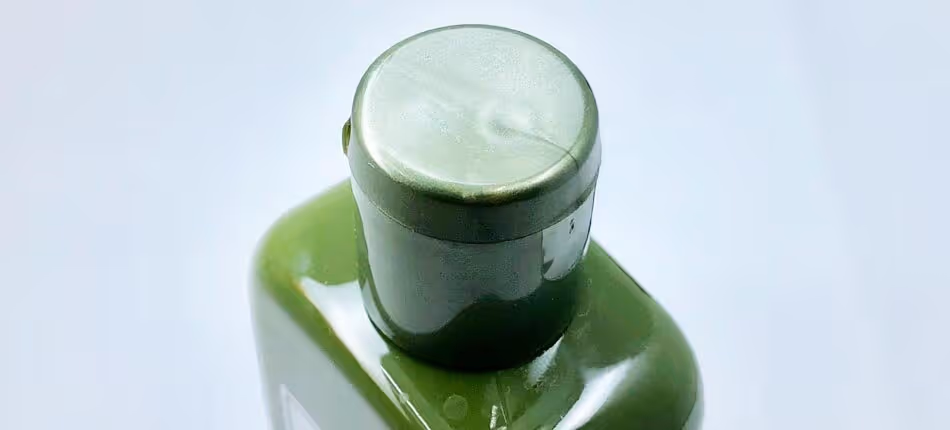
Sink Marks
Plastics cool at different rates depending on how thick the part is when it is removed from a mold. Thick areas often lead to a visible ‘sink’ mark where the surface dips slightly from a slower rate of cooling. Adding sink marks add an insane level of detail to a 3D model.

Fillets
A fillet (no, not a thin slice of meat), is a the surface between two faces of a part. There is no such thing as a perfect transition between two faces of a part. Even if on a microscopic scale, fillets are everywhere. Fillets are crucial because they reflect light and thus, help describe the shape of the product. Don’t forget your fillets and make sure they’re the right size. Fillets, rounded edges or bevels all help to make a more realistic rendering.
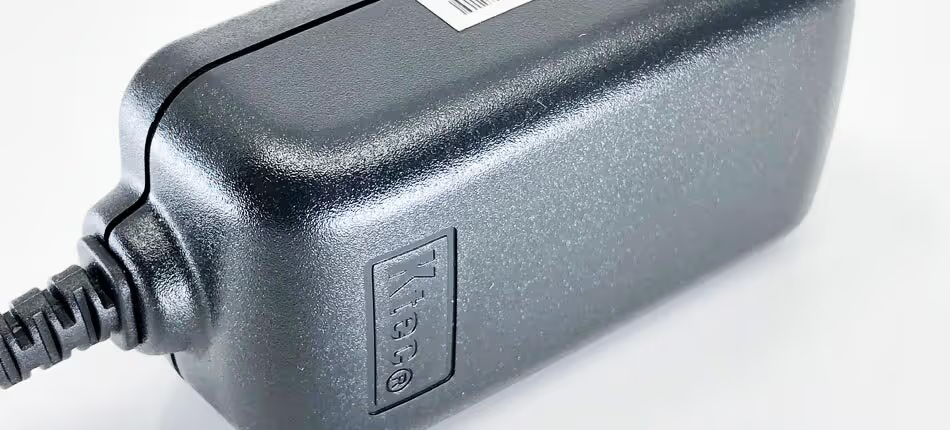
In-Mold Decoration, Stickers and Labels
If you’ll be doing some close-up macro shots of the product that will focus on an embossed or debossed logo or decoration, you’re best-off modeling that sucker right into the part.
While CAD programs are used to create perfect engineering data for manufacturing, many of the items above are the undesirable realities of imperfect manufacturing processes.
Pro Tip
If you’re chasing hyper-realism, it’s best to use a completely different model for visualization purposes where you can create these details that you would never want to add to a production model.
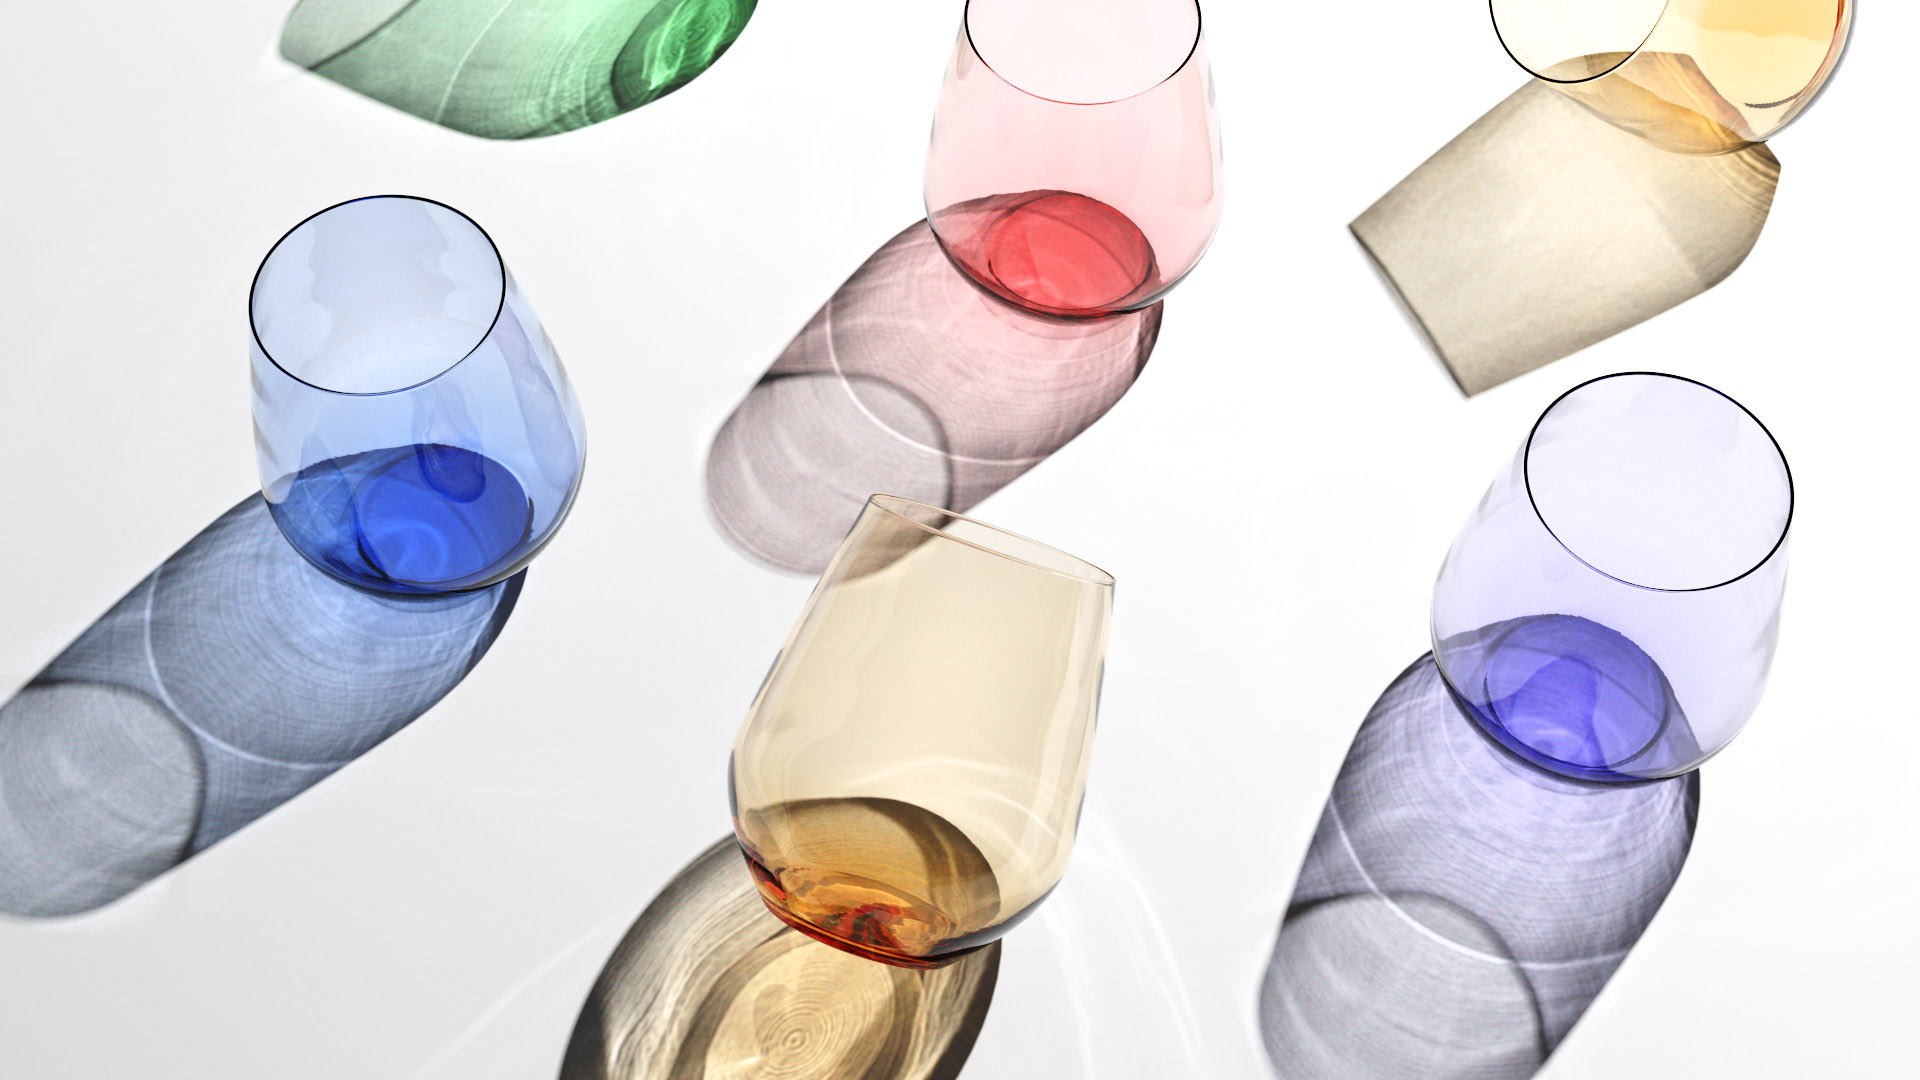
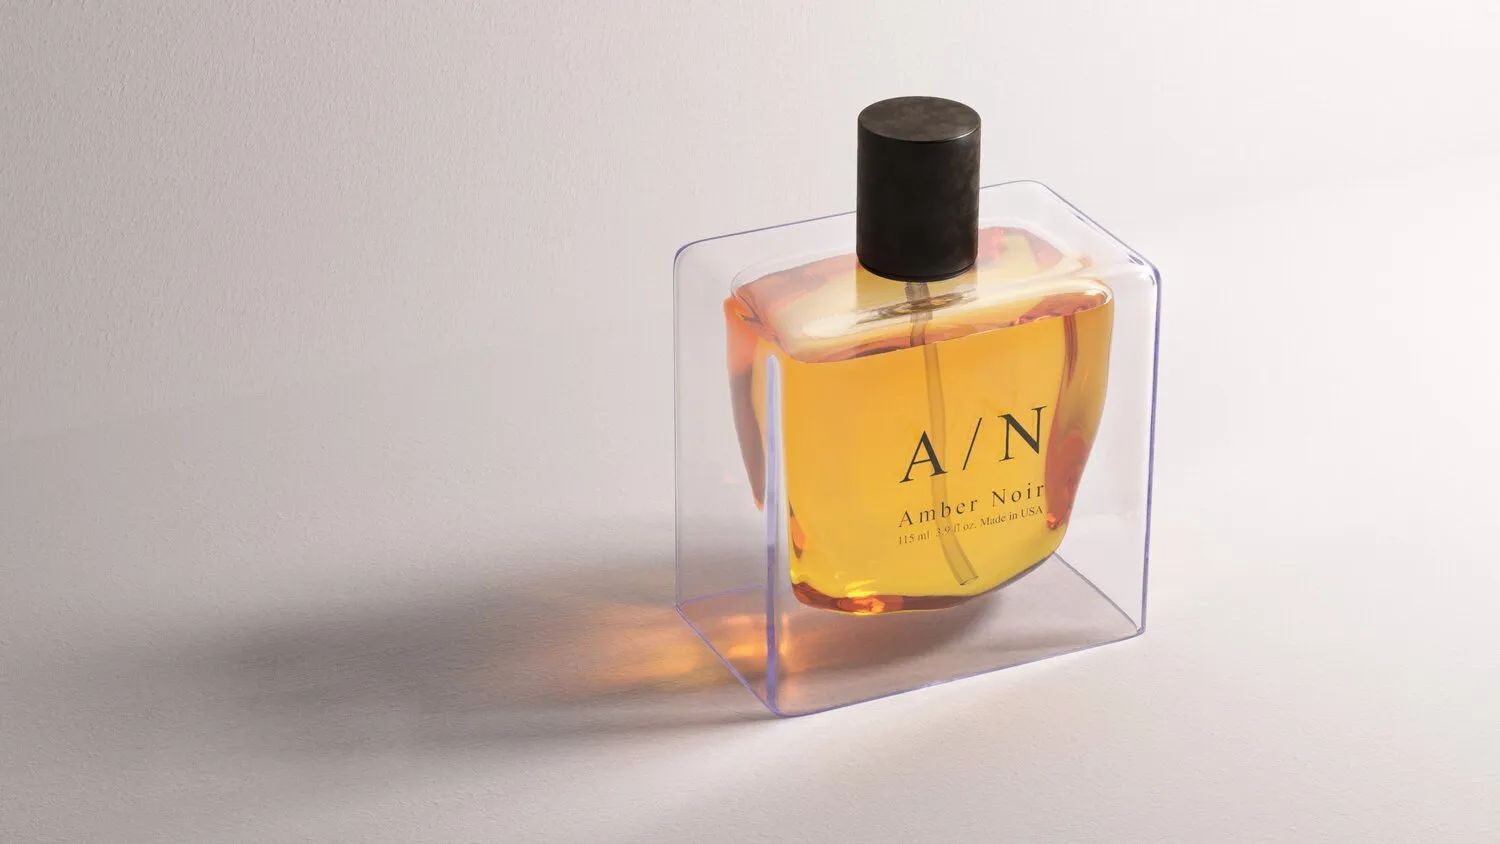
2. Materials
Material science isn’t just for engineers. By understanding the basics of light and a few material properties, you can go from shooting in the dark to composing materials like John Williams composed orchestral masterpieces. Here’s a few things you should be familiar with.
Diffuse Color
Often the base color of a material.
Specular Color
The color of mirror-like (non-diffused) reflections.
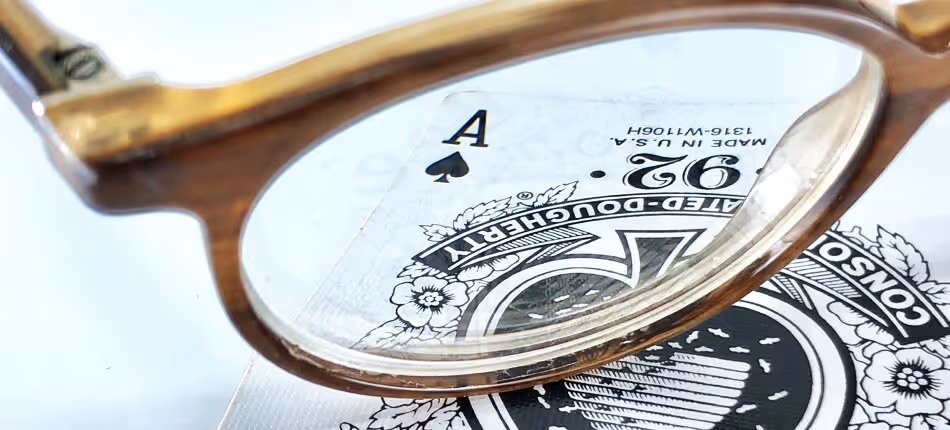
Index of Refraction (IoR)
A number that indicates how much slower light transmits through a transparent material than through a vacuum. Increasing IoR on opaque materials often makes the material appear harder by increasing contrast between specular highlights and diffuse color.
Transmission Color
The color of light inside a material. Often used to color transparent materials like glass and plastic.

Roughness
Microscopic surface imperfections that causes light to scatter across a surface. Increasing roughness makes a material appear more matte. There is no such thing as a truly perfectly smooth material on earth. Roughness is a very important feature of every material.
Color
Over-saturated and perfectly-uniform color is a realism-killer. Use textures to create variation in color and use photo-reference to appropriately match color saturation. This is why black and white CGI tend to look more realistic.
Bump Textures
Bump textures are images used to add highlights and shadows to give the impression that a surface has physical relief. This can be as subtle as orange peel on paint or aggressive as chunky gravel. Normal maps work even better than bump maps do! They’ll offer more accurate surface details. One down-side to bump or normal maps is that they’ll not actually change the shape of your model. This means silhouettes of a bumpy surface will still appear smooth. For full surface changes, you’ll want to use displacement maps as outlined below.

Displacement Textures
When adding textures, use displacement maps whenever possible. Displacement will actually push and pull the surface of the model to change its shape resulting in a more realistic texture. This is key for macro shots or when showing the edge of a material or silhouette of a product.
Pro Tip
16 and 32-bit displacement maps will help reduce stair-stepping and give you smoother results with displacement.
Texture Scale
Make sure your textures aren’t too large or small. Measure a real-world reference if possible.
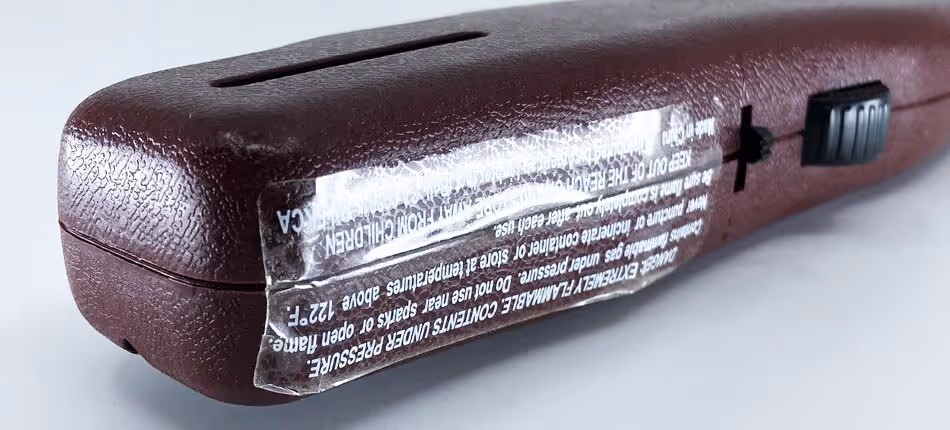
Labels or Graphics
Adding labels, stickers, logos or graphics often make a product much more believable. We see these details on our products, so seeing these will anchor an image or product in reality.
Sharpness and Feathering
When using textures or labels and graphics on your product, make sure the graphic has the appropriate amount of sharpening or blurring. Stickers or labels that are printed aren’t vector-sharp. Printers have limitations and ink bleeds. Try to capture this detail in your own labels if possible. Overly-sharp labels look fake.
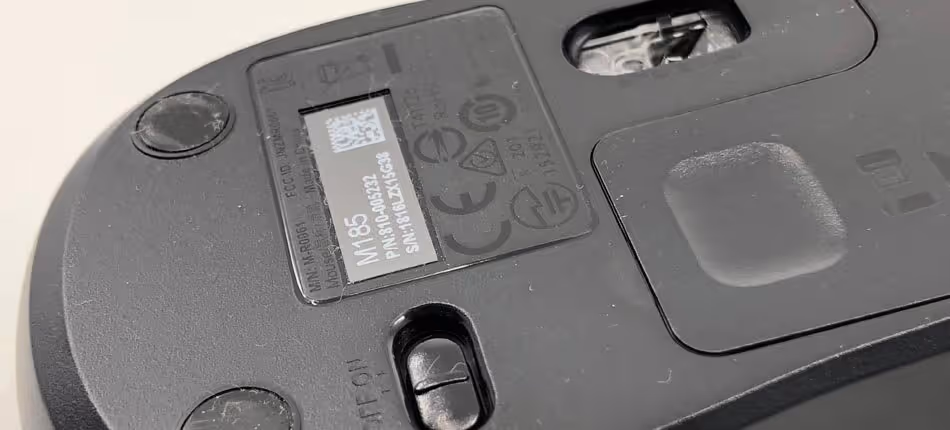
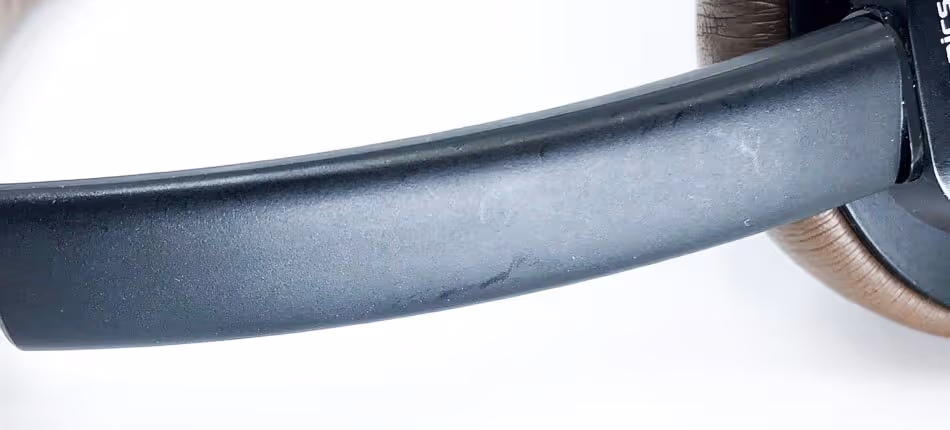
Imperfection
Nobody wants their new product to look like it was found in a dusty, abandoned barn. However, if you want to emulate a photograph of a product, a little bit of imperfection can go a long way. Here are some easy ones to get you started.
Dust
Bits of dirt, smudges, hairs and the errant fiber all have their place when applied with restraint. A little goes a long way, so use it sparingly.
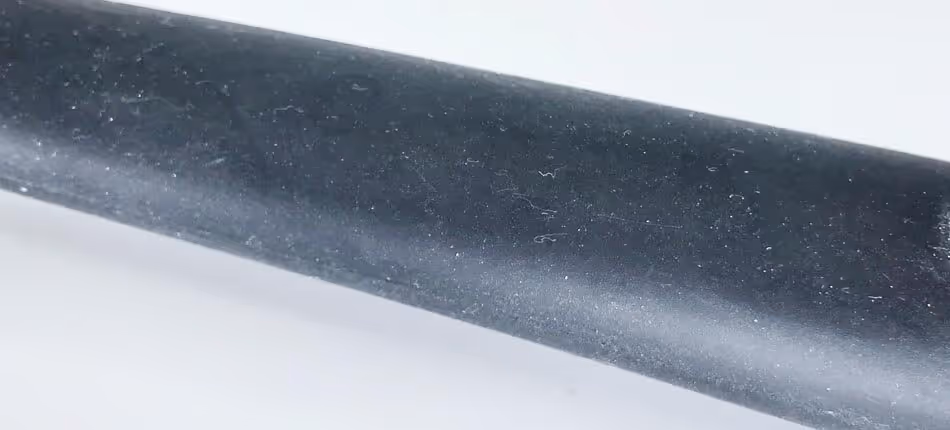
Smudges, Residue, Scuffs
A bit of a specular or roughness texture that shows skin oils, friction from packaging or the manufacturing process will help sell the realism.
Pro Tip
Use roughness textures to create variation in surface roughness for scratches, dust, residue, smudges, etc. My favorite place to get these are at Poliigon.com
Discoloration
A swirl in a metallic paint, or s tiny bit of color noise in a plastic will help bring in a little variation.
Depending on which render engine you use, your ability to control certain aspects of a material will vary. The key points though, are the more you can mimic reality, the better off you will be. By having physically-accurate materials, you rely less on your artistic sense and more on hard science and technology to simulate reality.
Level up your KeyShot Rendering skills
3. Camera
Some render engines have physical camera properties, meaning if it’s a control that exists on a camera, it’ll be an option inside your rendering software. This allows you to chose a lens and camera model and your software will consider the lens and sensor properties and shape the rendering appropriately. If your software doesn’t support such features, you’ll wan to use what you have to get as close as possible, then do the rest of tweaking in the post-production stage.
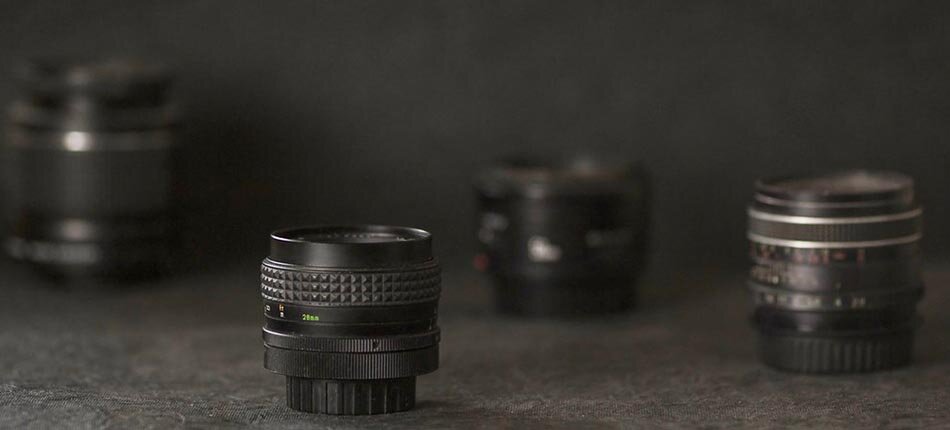
Focal Length
This is where you chose the length of the lens. Longer lenses are preferred for product photography because they minimize distortion of the image. A wider lens shows much more (having a larger field of view), but also can lead to great amounts of ‘fish-eye’ distortion. A loose use of thumb:
- 35mm – Street photography
- 50-80mm – Portrait photography
- 80-120mm – Product photography
Camera Distance
When using a camera in the real-world, the longer your lens, the further away you need to be from the subject. We don’t have that limitation in the rendering world, but it would benefit us to consider camera distance, especially if we plan on using DoF (Depth of Field), as there’s a relationship between DoF, Focal Length and Camera Distance. Getting these right will avoid making your product appear too large or small.
Depth of Field
DoF is when part of your image has a focal point. Anything behind or in front of the focal point will appear blurry. This is a great way to guide the viewer’s eye or eliminate distracting backgrounds. Make sure the amount of DoF you’re using is realistic for the length of lens and camera distance you’ve chosen or it may look odd.
Bokeh
If using a separate plate or background image for compositing, be sure you match the camera controls so your product’s blur or bokeh matches that of the plate you’ll composite it onto. If there’s a distinct shape to the bokeh in the plate, try to adjust the number of aperture blades to accomplish the same shape in your rendering.

Pitch, Tilt and Yaw
Nobody’s hand or tripod is perfect. By adding some variation to your camera’s coordinates and rotational values will add a nearly imperceptible bit of realism to the framing of your shot.
Dirty Lens or Sensor
Every once in awhile, there’s some visible bits of grime on a sensor or lens which will appear as a small fuzzy, darkened area on a photo. Who knows, maybe this is just what your image is missing. You’ll want it to be close to the camera and thus, far from the focal point which will make it blurry and less obvious.
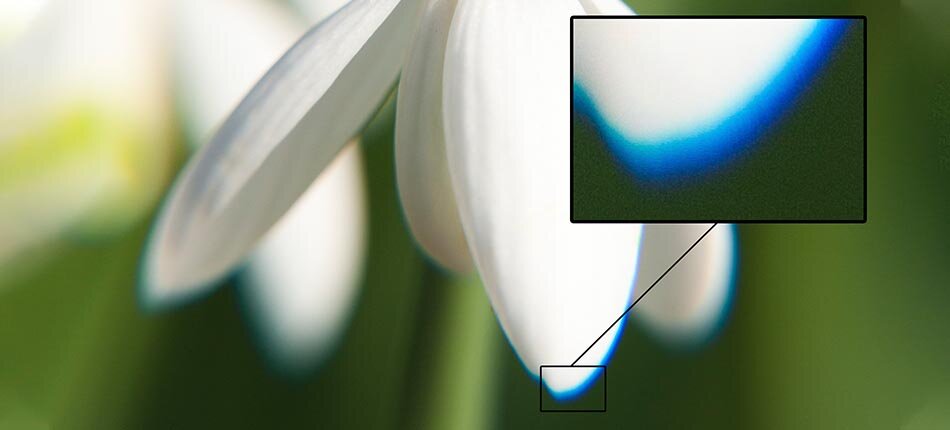
Chromatic Aberration
This used to be more common in old, cheap lenses. In high-contrast areas, you’ll notice colored fringes or outlines that seem to be shifted and offset from the product. Use sparingly.
Vignette
Darkening of the image mostly near the edges of the frame. This happens naturally and can help keep the viewer’s eye in the center of the frame. Use with a light touch.
Obviously, today’s cameras and lenses are very capable and advanced. We don’t want to get carried away making our nice image look like it was photographed with a potato, but when chasing reality, knowing a bit about cameras and light can go a long way. Try to emulate reality a little bit buy trying some of the above techniques.
4. Light
Light is obviously a massive part of rendering. I think it’s the most important part of it, really. Like many of the other tips here, I recommend trying to mimic reality. The more accurately your render engine calculates light, the better your images will be.
Physical Lights
This refers to using an object that emits light. This is usually used to mimic photographer’s lighting equipment or man-made light sources. Physical lights often produce more realistic looks than image-based lighting. Shadows can be controlled by moving and scaling physical lights. Larger lights produce software shadows.
Learn more about the difference between HDRIs and Physical lights.
HDRI Maps
These are images that are spherically-mapped around your scene and shine light down onto your product from every angle. HDRIs are great for evenly-lit products and for ease of use. They can be used to add content through reflections and color of light. I find that the best results come from using a combination of physical and image-based lighting. Here’s a link to my favorite place to get free HDRIs.
Global Illumination
This is when light is bounced off a surface and illuminates or colors another nearby surface. This is all around us and incredibly important when chasing realism. Make sure this is enabled if possible.
Caustics
Like Global Illumination, caustics are ever-present our world. However, unless you’re looking for the focused shapes light makes on a surface when it is refracted or reflected, it’s just going to slow down the render engine, significantly. Caustics are often needed when shining light through glass, clear plastics or reflected off metals. Learn all about rendering caustics in KeyShot here.

Clear Direction
We use light to describe the form of a product. This is how a 3D object can still look 3D when on a flat screen or piece of paper. Having a clear primary direction of light is key to good lighting.
Contrast
Don’t over-light a product. A great drummer once said, “If you accent every beat, you accent nothing”—same goes for lighting. Deliberately under-light areas to create contrast and interest.
Lighting is a complex subject for many people. Knowing how light behaves, reflects and moves throughout a scene will significantly improve your product renderings.
Pro Tip:
I recommend reading a book or two on lighting for photographers or artists. Here are my top picks:
https://youtu.be/ztwPdmFMssA
5. Context
A catalog or e-commerce rendering doesn’t need contest. It is often a product floating in a sea of white. When pitching a new idea, product or concept it’s usually helpful to see the product being used or in context. This also helps heighten the emotional response a viewer has to the image. Think about perfume or liquor advertisements. Let’s look at ways to add context to your product renderings.
Ground Plane
Let’s do away with anti-gravity products and make sure our model is grounded on a plane. You can then use ground shadows intentionally as part of the composition. Also, ground planes can and should be textured like any other material.
Walls
Using walls can provide a more natural feeling background than a ground plane that abruptly ends in a white or black void.
Backdrop
A backdrop ramp or gradient can provide a distraction-free background. The result is similar to using DoF but often faster to render.
Photographic Background
Using backplates, are a great way to blend photography with rendering. Seeing a real photo behind your product heightens realism. Just be sure to make necessary lighting and color adjustments to make the backplate and product match.
Perspective Matching
If you shoot your own backplates, you’ll likely know what settings and lens was used and you can match the ‘camera’ in your rendering software. Making sure the perspective matches between the backplate and product is essential to tricking the eye into believing it’s looking at a photo.
3D models
Adding other complimentary objects can add context. If I’m rendering a knife, having some vegetables and a cutting board in the same image makes a lot of sense. It can also enhance the presentation of the product. Help viewers visualize how this product fits into their lives.
Context is king when trying to create a photographic rendering. Starting with good complementary models and backplates will help with this. Just be sure to sweat every detail when matching backplates. Often, you’ll need to do the final composite in another program in the post-processing stage.
6. Render Settings
We’ve made it this far, it would be a shame to mis-manage our render settings. If your rendering has fireflies (distracting, white pixels), grainy shadows or a low-resolution, it can distract from the realism you tried to capture. Here’s what I recommend:
https://www.youtube.com/watch?v=Cl6Ba07fJEY&ab_channel=WillGibbons
Global Illumination
We covered this above, so I’ll just say you should have it enabled in the final render.
Caustics
Same as above, it depends on the materials in your scene, but if you can afford the render time and have highly refractive or reflective materials, go ahead and render with this enabled.
Ray Bounces
Make sure you have enough of these enabled. This will prevent black areas where light doesn’t pass through layers of transparent materials, or gets trapped inside gemstones. You’ll need one ray bounce for each surface of transparent material your light needs to transmit through.
Filmic Response
This has gotten more popular recently and hasn’t made its way into all the render engines yet. In photography, colors tend to desaturate when exposed to bright lights. This is now being emulated in render engines to boost realism. Use this if possible.
Depth of Field
Be sure to render with DoF enabled, even if it’s just a little bit. A bit will go a long way since cameras always have some DoF.
Passes and Layers
Finally, to prepare ourselves for post-processing, we want to be sure to output any render passes or layers we may need to make editing and compositing our final image easier. For many, this means an ID or Clown pass, Shadow Pass, Ambient Occlusion, Normals, Global Illumination, and Lighting pass.
Bit-Depth
Rendering out an 8-bit JPG will produce an image that will be very limited when it comes to tone-mapping. Render a 32-bit-per-channel image to produce as much information as possible during the render process. Common 32-bit formats include Tiff and Open EXR. This will also help keep gradients between low-contrast colors as smooth as possible and help prevent banding.
Learn more about bit-depth here.
Resolution
Rendering at least a 1920×1080 image will give you a large enough image to meet modest print requirements or viewing requirements on a modern-day website. However, going bigger will give you a sharper-looking image and more pixels to work with when editing or cropping in. I suggest 4K (3840×1920).
Now that we’ve covered what should be considered during the render phase, let’s look at how we can put this all together in a final, composited image.
7. Post-processing
Depending on your rendering software, you may be able to apply some post-processing in the program either before, during or after the render process. In my case, I tend to take care of post-processing after rendering in a different program than I use to render with.
Photographic Representation
Much of this article’s tips are aimed at making your CGI look more like a photograph. A Realistic rendering is supposed to look like a photo. Because we’re used to seeing photographs, the characteristics of a photo are good at tricking our brains into thinking we’re looking at something that exists.
Software Choices
Below are some effects that are often performed during post-processing if they can’t be rendered or easily controlled in your rendering package.
Blur
One giveaway that something has been rendered is an image that’s simply too sharp, not to mention, it’ll be unpleasant to look at. Adding just the right amount of blur to soften an image can go a long way. And if some part of your image is in motion, you’ll want to be sure the motion blur is there too. This is often done in-renderer, but sometimes can be done in post.
Compositing
Compositing is when you take a rendering and place it into context by dropping a photo plate or background behind the rendered object. Matching the lighting, perspective, depth of field and any other little details can make or break the final result. Passes and layers can help out with this. In some cases, compositing your image in post will be easier and offer more control than doing so in renderer.
https://youtu.be/INtXQa5CrsQ
Diffusion
Think of a dreamy, hazy, soft effect seen in some Hollywood classics or 80s TV soap operas. That is Diffusion. While diffusion can be taken too far, a little bit is often welcome. This effect will cause brighter areas of the image to give off a bit of a glow or halo. It also happened naturally on older film, which is why it works well for nostalgic images.
Exposure
You should be controlling your lighting in your rendering software, but sometimes it’s just easier to massage the light in post. One scenario that comes to mind is interiors, which are notorious for rendering too dark. You’ll want to be sure to have a 16 or 32-bit image (TIFF or EXR) here for best results.
Firefly Stamping
Not the bugs, but the bright white out-of-place pixels. While rendering with more samples can usually fix fireflies, sometimes your time is better spent stamping them out. Or, if you have access to KeyShot 10, use the Firefly Filter in the Image Styles tab.
https://youtu.be/XeZSUR-_Svw
Glow
Not happy with how your LEDs or other illuminated lights look after rendering? Sometimes a soft brush is a quick fix. Again, having something work in the renderer is great, but not always possible.
Grain
Grain is of course not a real thing to our eyes, but cameras that struggle to get enough light to the sensor can produce grainy images. This is most obvious in dark areas, not bright areas of a rendering. Grain can also be used to tell a story or evoke an emotion, but don’t overdo it. Here’s a tutorial on how to add grain.
Lens Flare
Ever see a JJ Abrams film? Then you should be familiar with Lens flare. It’s an aberration that occurs when focused, bright light is cast across the surface of an (often round) lens. The result is a bright streak that will likely either remind you of Star Wars or look like an artsy effect. This tutorial should get you well on your way.
Lens Distortion
Lenses aren’t perfect. Because they’re often made of curved glass elements, the subjects of a photo tend to get distorted. They can either be pinched in or expanded outward like a bubble. The wider your lens or lower the focal length, the more you’re likely to see the bubble-like distortion. This can go a long way to making images look more photographic.
Levels
Adjusting levels is just re-distributing the range of values in your image. By crushing whites and blacks, you’re able to take the wide range of values your renderer produced and make them look a bit more photo-like. You purposely discard some information and end up with a higher-contrast image.
LUTs
A LUT is a Look-Up Table. It is a simple algorithm that converts colors from one value to another. The result is what we often refer to as filters. A cinematic LUT is a lightweight file that will color-grade your image for you. Often LUTs are made to mimic specific models of popular cameras. Here’s a solid tutorial about LUTs that I recommend!
Occlusion
Most render engines can create an occlusion pass. Use this to add more contrast to detailed areas on your image. Occlusion is just shading where one surface meets another, so it’s not realistic, but it’s helpful for small e-commerce images that need to read well at small scales.
Good Luck!
Hopefully this didn’t turn into too much of a glossary. My goal was to give you a high-level but also quite comprehensive list of ways you can create more realistic renderings. Lots of physics come into play when simulating materials and light (which is what rendering is), so I felt the need to break down some of the lingo you may have heard before.
While there isn’t a ‘make it good button’, paying attention to detail and striving to improve will go a long way. I hope this article gives you some ideas and inspiration.